NOVA Reseller Domains Page: Difference between revisions
(Created page with "= Domains = This section of NOVA allow you to access the domains currently on your platform. <blockquote>frameless|932x932px</blockquote> == Search Bar == You search for the domain you need here. == Add Domain == Add a domain to the system here. Once you select "Add Domain" to the platform, you will be taken to a small pop up window like this.<blockquote>frameless|618x618px </blockquote> === Basic === The...") |
No edit summary |
||
| (3 intermediate revisions by the same user not shown) | |||
| Line 1: | Line 1: | ||
This page is part of the [[Reseller Guides]]. | |||
= Domains = | = Domains = | ||
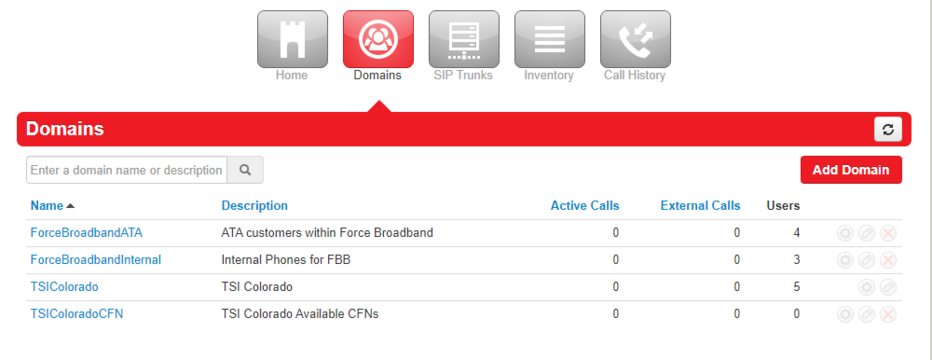
The Domains section of NOVA allows you to access the domains currently on your platform. <blockquote>[[File:ResellerDomains1.png|frameless|932x932px]]</blockquote> | |||
== Search Bar == | == Search Bar == | ||
| Line 10: | Line 14: | ||
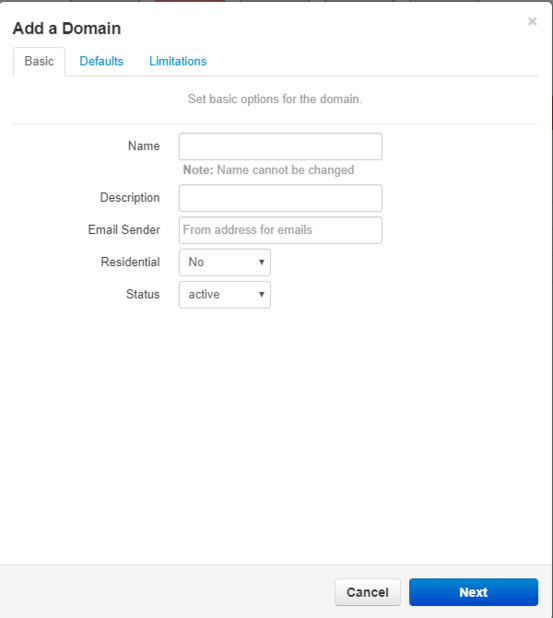
Once you select "Add Domain" to the platform, you will be taken to a small pop up window like this.<blockquote>[[File:ResellerDomains2.png|frameless|618x618px]] </blockquote> | Once you select "Add Domain" to the platform, you will be taken to a small pop up window like this.<blockquote>[[File:ResellerDomains2.png|frameless|618x618px]] </blockquote> | ||
=== Basic === | === <u>Basic</u> === | ||
The basic tab holds all of our domain top level settings. | The basic tab holds all of our domain top level settings. | ||
| Line 20: | Line 24: | ||
==== Email Sender ==== | ==== Email Sender ==== | ||
Email Sender is where you put your reseller email address for when you receive email notifications from the domain it tells the emails where to go. Example <u>notify@vestednetworks.com</u> | Email Sender is where you put your reseller email address for when you receive email notifications from the domain it tells the emails where to go. Example <u>notify@vestednetworks.com</u> | ||
==== Residential ==== | ==== Residential ==== | ||
| Line 26: | Line 30: | ||
==== Status ==== | ==== Status ==== | ||
This enables and disables the domain. | |||
* NOTE! Leave Status as "'''Active'''" unless you want to stop services for the domain. | |||
=== Defaults === | |||
=== <u>Defaults</u> === | |||
Now we switch to the Defaults tab | Now we switch to the Defaults tab | ||
| Line 56: | Line 63: | ||
Enable Voicemail check box allows the domain to receive voicemail. Leave this on. | Enable Voicemail check box allows the domain to receive voicemail. Leave this on. | ||
* '''NOTE! You need to make sure this information is correct as if someone calls 911, even if they hang up immediately after dialing the call, and the information is wrong, you can be slapped with a $150 fee from the E911 service in your state. | * '''NOTE!''' You need to make sure this information is correct as if someone calls 911, even if they hang up immediately after dialing the call, and the information is wrong, you can be slapped with a $150 fee from the E911 service in your state. | ||
==== Preferred Server Location ==== | ==== Preferred Server Location ==== | ||
Preferred Server Location defaults to No Preference but you can chose a specific server location if you wish. If you do, an option to resync all the phones in this domain pops up. This is mainly for if you are changing a domain after it has been created. | Preferred Server Location defaults to No Preference but you can chose a specific server location if you wish. If you do, an option to resync all the phones in this domain pops up. This is mainly for if you are changing a domain after it has been created. | ||
=== Limitations === | |||
The Limitations screen is rather simple as we leave all the settings at unlimited. <blockquote>[[File:ResellerDomains3.png|frameless|674x674px]]</blockquote>When finished, press the Add button to finish creating the domain and thus adding it to your platform. | === <u>Limitations</u> === | ||
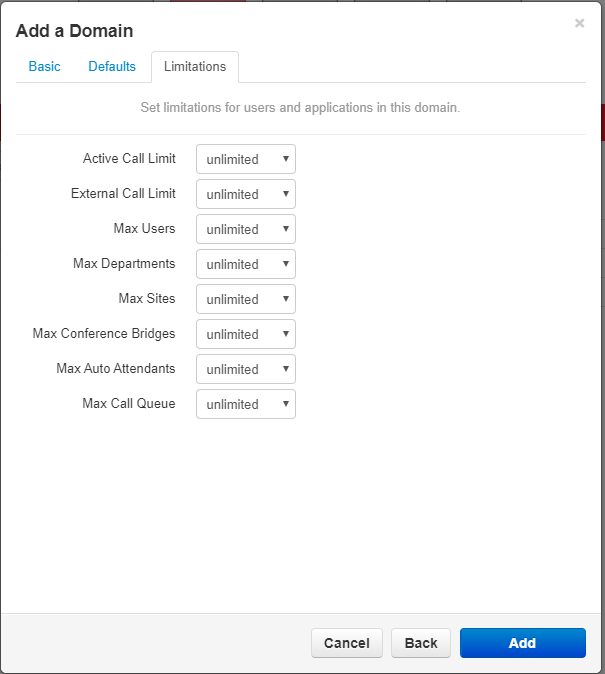
The Limitations screen is rather simple as we generally leave all the settings at unlimited. <blockquote>[[File:ResellerDomains3.png|frameless|674x674px]]</blockquote>When finished, press the Add button to finish creating the domain and thus adding it to your platform. | |||
== Deleting Domains == | |||
When it comes time to delete a domain you will first need to unassign any numbers and users associated with that domain. | |||
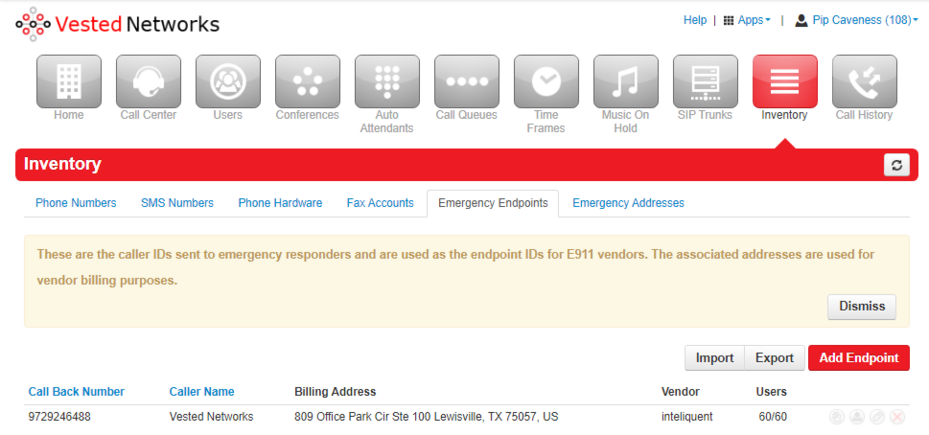
You will then need to remove all emergency endpoints and emergency addresses. | |||
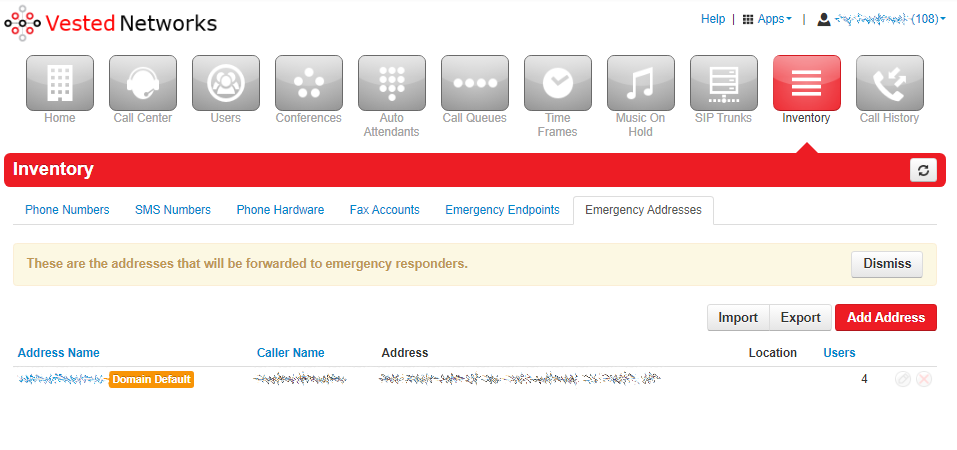
The callback number and address listed here still count as assigned items and will prevent the domain from being removed. | |||
=== Endpoints === | |||
Please remove all endpoints attached to the domain. <blockquote>[[File:Reseller delete domain1.png|frameless|929x929px]]</blockquote> | |||
=== Addresses === | |||
Please remove all addresses attached to the domain.<blockquote>[[File:Reseller delete domain2.png|frameless|957x957px]]</blockquote> | |||
Latest revision as of 09:33, 25 April 2024
This page is part of the Reseller Guides.
Domains
The Domains section of NOVA allows you to access the domains currently on your platform.
Search Bar
You search for the domain you need here.
Add Domain
Add a domain to the system here.
Once you select "Add Domain" to the platform, you will be taken to a small pop up window like this.
Basic
The basic tab holds all of our domain top level settings.
Name
The NAME field is the name of the domain on the platform you will use to find and interact with when a customer calls in with an issue or to make changes to their domain. It will also make up part of the login name the customer will use to get into the NOVA portal. Therefore, we recommend that you make the name short using upper and lower case letters and numbers. NO SPACES and NO SPECIAL CHARACTERS of any kind as these cause issues with the domain creation process. BE SURE TO SPELL THE NAME
Description
The Description field is where you can put a more complete name for the company than the shortened form you used for the domain name. Example: Domain name is ACME instead of Advanced Computer Meme Executors. In this field you can use spaces, numbers, letters, and special characters if needed.
Email Sender
Email Sender is where you put your reseller email address for when you receive email notifications from the domain it tells the emails where to go. Example notify@vestednetworks.com
Residential
Leave Residential to "NO" and Status as "Active"
Status
This enables and disables the domain.
- NOTE! Leave Status as "Active" unless you want to stop services for the domain.
Defaults
Now we switch to the Defaults tab
The Default settings on this page with dictate the basic settings for the domain.
Dial Permission
Dial Permission will always be US and Canada
Time Zone
Time Zone will change depending on where you are in the country.
Voicemail Transcription
Voicemail Transcription is defaulted to disabled
Area Code
Area Code is where you put the area code of the customer's phone number
Caller Name
Caller Name is what name will be displayed on the caller ID when the customer calls someone.
Caller ID
Caller ID is where the phone number that is going to main number for the customer.
911 Caller ID
911 Caller ID is where the phone number the customer wants E911 to be bonded to will go. Usually, it is the same as the Caller ID phone number but not always.
Enable Voicemail check box allows the domain to receive voicemail. Leave this on.
- NOTE! You need to make sure this information is correct as if someone calls 911, even if they hang up immediately after dialing the call, and the information is wrong, you can be slapped with a $150 fee from the E911 service in your state.
Preferred Server Location
Preferred Server Location defaults to No Preference but you can chose a specific server location if you wish. If you do, an option to resync all the phones in this domain pops up. This is mainly for if you are changing a domain after it has been created.
Limitations
The Limitations screen is rather simple as we generally leave all the settings at unlimited.
When finished, press the Add button to finish creating the domain and thus adding it to your platform.
Deleting Domains
When it comes time to delete a domain you will first need to unassign any numbers and users associated with that domain.
You will then need to remove all emergency endpoints and emergency addresses.
The callback number and address listed here still count as assigned items and will prevent the domain from being removed.
Endpoints
Please remove all endpoints attached to the domain.
Addresses
Please remove all addresses attached to the domain.
