Creating a Custom Directory
- Login to nova.vestednetworks.com
- Once logged into your portal, click on the Contacts tab. Here is where you will see a list of extensions pertaining to your company.
- Click on Add Contact in the top right corner to add a new contact to your list
- Fill in what information you want to be stored for your contact

- Once saved, you will see your contact appear in the list
Once you have all of your contacts added to the list, the next step is to sync our phone with our new contacts list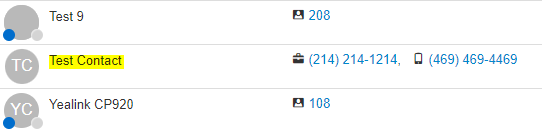
- Click on the Phones tab, then click on the gear icon next to your device and click Yes to modify the configuration
- Once in the NOVA Designer for your device, click on the top left of the screen as shown below. It may display as "Coworkers" or "Favorites" in your case
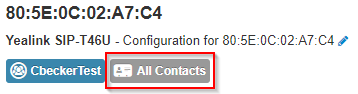
- Click on the directory drop down and select All Contacts. This option will allow you to keep your company extensions in the directory along with the custom contacts you just added above. If you want the directory to display ONLY your custom contacts, then chose the My Contacts option

- You can choose which individual contacts in the list are displayed on your device by clicking the eye symbol. If you click this and the contact greys out, it will not be displayed on your devices directory

- You can choose which individual contacts in the list are displayed on your device by clicking the eye symbol. If you click this and the contact greys out, it will not be displayed on your devices directory
- Once you are happy with your directory, click Done
- Last step, click on the arrow next to Save in the bottom right, and choose the option to Save and Resync. Your desk phone status light will flash, the phone may reboot, and when it comes back your custom contacts should now be in your directory


