Vested Networks Google Chrome Extension: Difference between revisions
m (update) |
(Updated guide and link for the new Chrome Extension.) |
||
| Line 1: | Line 1: | ||
= Chrome Extension Installation & Setup Guide = | |||
Follow the steps below to install the Vested Networks Chrome extension, sign in, and configure your settings. | |||
== | == 1. Install the Chrome Extension == | ||
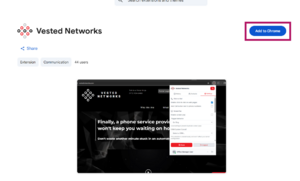
# Click [https://chromewebstore.google.com/detail/cdhcnkogincgmmkfobldnegjpdghkadh?utm_source=item-share-cb here] to open the extension in the Chrome Web Store. | |||
# Click Add to Chrome.<blockquote>[[File:Imagechrome2.png|frameless]]</blockquote> | |||
# Once the extension has been installed, locate the puzzle piece icon (Extensions) in the top-right corner of your Chrome browser. | |||
# Click the puzzle piece icon to view your installed extensions. | |||
# Find the extension in the list and click the pin icon to pin it to your browser toolbar for easy access. | |||
== 2. Sign In == | |||
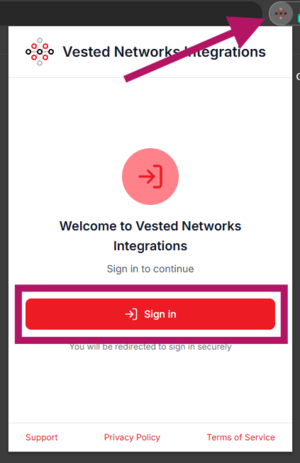
# Click the extension icon in your Chrome toolbar. | |||
# Click Sign In.<blockquote>[[File:Imagechrome3.png|frameless]]</blockquote> | |||
# A new window will open to the Nova portal login page.<blockquote>[[File:Imagechrome4.png|frameless]]</blockquote> | |||
# Sign in using your normal credentials. | |||
Once you are signed in, you will have access to your call history, contacts, and settings. | |||
== 3. Call History == | |||
From the Call History section, you can view your calls and use the available filters: | |||
* All – Displays all calls. | |||
* Inbound – Displays incoming calls. | |||
* Outbound – Displays outgoing calls. | |||
* Missed – Displays missed calls. | |||
== 4. Contacts == | |||
Under the Contacts tab, you can view contacts within your company. | |||
Use the search function to quickly find a specific contact as needed. | |||
== 5. Settings == | |||
Under the Settings tab, you can configure various extension features and preferences. | |||
=== Click-to-Dial === | |||
Enable Click-to-Dial to add a call button next to phone numbers displayed on web pages. | |||
=== Screen Pop === | |||
Enable Screen Pop if you would like the extension to display information when a call is received. | |||
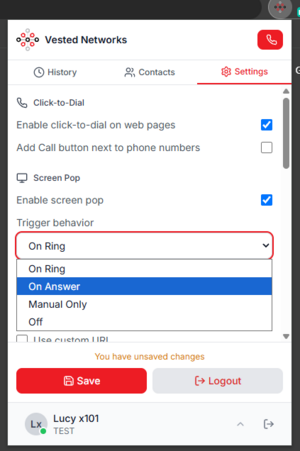
If Screen Pop is enabled, select a Trigger Behavior: | |||
* On Ring – Displays the screen pop when the phone begins ringing. | |||
* On Answer – Displays the screen pop when the call is answered. | |||
* Manual Only – Displays the screen pop only when manually triggered. | |||
* Off – Disables the screen pop.<blockquote>[[File:Imagechrome5.png|frameless]]</blockquote> | |||
=== CRM System === | |||
The CRM System setting is only needed if your phone system is currently integrated with a CRM. | |||
A CRM integration is not required to use the Screen Pop or Click-to-Dial features. | |||
=== Device Settings === | |||
Use Device Settings to select which device you would like to use to answer calls. | |||
=== Outbound Caller ID === | |||
Outbound Caller ID determines the phone number that will be displayed when you make an outbound call. | |||
=== Notifications === | |||
Under Notifications, you can enable or disable: | |||
* Incoming Calls | |||
* Missed Calls | |||
=== Display Language === | |||
Use the Display Language dropdown menu to select your preferred language. | |||
== 6. Save Your Changes == | |||
After making your changes, scroll to the bottom of the Settings tab and click the red Save button to confirm and apply your settings. | |||
You can also click Logout at the bottom of the Settings tab when you are finished using the extension. | |||
If you have any questions about this process, or if you need assistance, please reach out to our Support Team by dialing HELP(4357) on your desk phone, calling (972) 924-6488, or emailing help@vestednetworks.com. | If you have any questions about this process, or if you need assistance, please reach out to our Support Team by dialing HELP(4357) on your desk phone, calling (972) 924-6488, or emailing help@vestednetworks.com. | ||
Latest revision as of 09:38, 9 September 2026
Chrome Extension Installation & Setup Guide
Follow the steps below to install the Vested Networks Chrome extension, sign in, and configure your settings.
1. Install the Chrome Extension
- Click here to open the extension in the Chrome Web Store.
- Click Add to Chrome.
- Once the extension has been installed, locate the puzzle piece icon (Extensions) in the top-right corner of your Chrome browser.
- Click the puzzle piece icon to view your installed extensions.
- Find the extension in the list and click the pin icon to pin it to your browser toolbar for easy access.

2. Sign In
- Click the extension icon in your Chrome toolbar.
- Click Sign In.
- A new window will open to the Nova portal login page.
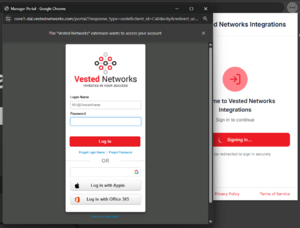
- Sign in using your normal credentials.


Once you are signed in, you will have access to your call history, contacts, and settings.
3. Call History
From the Call History section, you can view your calls and use the available filters:
- All – Displays all calls.
- Inbound – Displays incoming calls.
- Outbound – Displays outgoing calls.
- Missed – Displays missed calls.
4. Contacts
Under the Contacts tab, you can view contacts within your company.
Use the search function to quickly find a specific contact as needed.
5. Settings
Under the Settings tab, you can configure various extension features and preferences.
Click-to-Dial
Enable Click-to-Dial to add a call button next to phone numbers displayed on web pages.
Screen Pop
Enable Screen Pop if you would like the extension to display information when a call is received.
If Screen Pop is enabled, select a Trigger Behavior:
- On Ring – Displays the screen pop when the phone begins ringing.
- On Answer – Displays the screen pop when the call is answered.
- Manual Only – Displays the screen pop only when manually triggered.
- Off – Disables the screen pop.

CRM System
The CRM System setting is only needed if your phone system is currently integrated with a CRM.
A CRM integration is not required to use the Screen Pop or Click-to-Dial features.
Device Settings
Use Device Settings to select which device you would like to use to answer calls.
Outbound Caller ID
Outbound Caller ID determines the phone number that will be displayed when you make an outbound call.
Notifications
Under Notifications, you can enable or disable:
- Incoming Calls
- Missed Calls
Display Language
Use the Display Language dropdown menu to select your preferred language.
6. Save Your Changes
After making your changes, scroll to the bottom of the Settings tab and click the red Save button to confirm and apply your settings.
You can also click Logout at the bottom of the Settings tab when you are finished using the extension.
If you have any questions about this process, or if you need assistance, please reach out to our Support Team by dialing HELP(4357) on your desk phone, calling (972) 924-6488, or emailing help@vestednetworks.com.