Creating a Custom Directory for a Specific Phone: Difference between revisions
Jump to navigation
Jump to search
(Creating Creating a Custom Directory for a Specific Phone Complete) |
No edit summary |
||
| (2 intermediate revisions by one other user not shown) | |||
| Line 1: | Line 1: | ||
Using the web portal, you can create customer directory entries for people you frequently dial. This article will take you through the process step by step. | |||
== | == Steps == | ||
#Login to nova.vestednetworks.com | # Login to [https://nova.vestednetworks.com nova.vestednetworks.com] | ||
#Once logged into your portal, click on | # Once logged into your portal, click on '''Contacts.''' Here is where you will see a list of extensions pertaining to your company. | ||
#Click on | # Click on '''Add Contacts''' in the top right corner to add a new contact to your list | ||
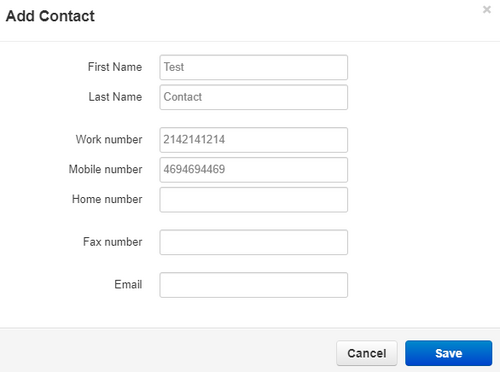
#Fill in what information you want to be stored for your contact. '''You do not have to fill in all of the information offered''' | # Fill in what information you want to be stored for your contact. '''You do not have to fill in all of the information offered''' <blockquote>[[File:Add Contact Fields.png|frameless|500x500px]]</blockquote> | ||
#Once saved, you will see your contact appear in the list [[File:Contacts List.png|frameless| | # Once saved, you will see your contact appear in the list<blockquote>[[File:Contacts List.png|frameless|500x500px]]</blockquote>Once you have all of your contacts added to the list, the next step is to sync our phone with our new contacts list | ||
# Click on the '''Phones Tab''' at the top, then click on the '''Settings Icon''' next to your device, and select '''Yes'''<blockquote>[[File:PhoneSettings.png|frameless|1218x1218px]]</blockquote> | |||
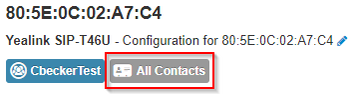
#Click on | # Once in the NOVA Designer for your device, click on the top left of the screen as shown below. It may display as "Coworkers" or "Favorites" in your case<blockquote>[[File:Phone Contacts List.png|frameless|357x357px]]</blockquote> | ||
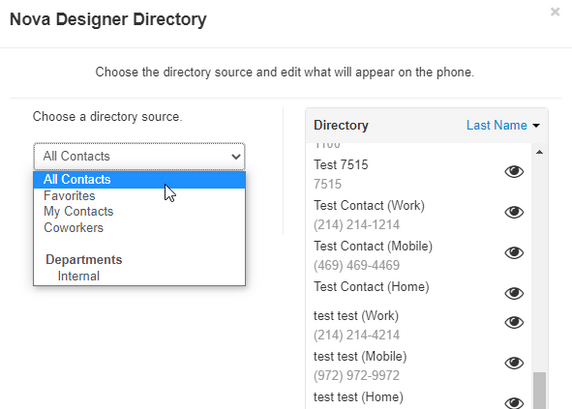
#Once in the NOVA Designer for your device, click on the top left of the screen as shown below. It may display as "Coworkers" or "Favorites" in your case | # Click on the directory drop down and select '''All Contacts'''. This option will allow you to keep your company extensions in the directory along with the custom contacts you just added above. If you want the directory to display ONLY your custom contacts, then chose the '''My Contacts''' option<blockquote>[[File:Phone Contacts Drop Down.png|frameless|572x572px]]</blockquote> | ||
#Click on the directory drop down and select '''All Contacts'''. This option will allow you to keep your company extensions in the directory along with the custom contacts you just added above. If you want the directory to display ONLY your custom contacts, then chose the '''My Contacts''' option | ## You can choose which individual contacts in the list are displayed on your device by clicking the . If you click this and the contact greys out, it will not be displayed on your devices directory<blockquote>[[File:Hide Contacts List.png|frameless|240x240px]]</blockquote> | ||
#Once you are happy with your directory, click | # Once you are happy with your directory, click '''Done''' | ||
#Last step, click on the arrow next to '''Save''' in the bottom right, and choose the option to '''Save and Resync''' Your desk phone status light will flash, the phone may reboot, and when it comes back your custom contacts should now be in your directory [[File:Save and Resync Button.png|frameless| | # Last step, click on the arrow next to '''Save''' in the bottom right, and choose the option to '''Save and Resync'''. Your desk phone status light will flash, the phone may reboot, and when it comes back your custom contacts should now be in your directory<blockquote>[[File:Save and Resync Button.png|frameless|615x615px]]</blockquote> | ||
If you have any questions about this process, or if you need assistance, please reach out to our Support Team by dialing HELP(4357) on your desk phone, calling (972) 924-6488, or emailing help@vestednetworks.com. | |||
Latest revision as of 13:16, 19 May 2023
Using the web portal, you can create customer directory entries for people you frequently dial. This article will take you through the process step by step.
Steps
- Login to nova.vestednetworks.com
- Once logged into your portal, click on Contacts. Here is where you will see a list of extensions pertaining to your company.
- Click on Add Contacts in the top right corner to add a new contact to your list
- Fill in what information you want to be stored for your contact. You do not have to fill in all of the information offered
- Once saved, you will see your contact appear in the list
Once you have all of your contacts added to the list, the next step is to sync our phone with our new contacts list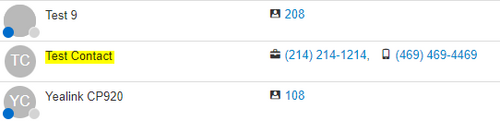
- Click on the Phones Tab at the top, then click on the Settings Icon next to your device, and select Yes

- Once in the NOVA Designer for your device, click on the top left of the screen as shown below. It may display as "Coworkers" or "Favorites" in your case
- Click on the directory drop down and select All Contacts. This option will allow you to keep your company extensions in the directory along with the custom contacts you just added above. If you want the directory to display ONLY your custom contacts, then chose the My Contacts option
- You can choose which individual contacts in the list are displayed on your device by clicking the . If you click this and the contact greys out, it will not be displayed on your devices directory

- You can choose which individual contacts in the list are displayed on your device by clicking the . If you click this and the contact greys out, it will not be displayed on your devices directory
- Once you are happy with your directory, click Done
- Last step, click on the arrow next to Save in the bottom right, and choose the option to Save and Resync. Your desk phone status light will flash, the phone may reboot, and when it comes back your custom contacts should now be in your directory


If you have any questions about this process, or if you need assistance, please reach out to our Support Team by dialing HELP(4357) on your desk phone, calling (972) 924-6488, or emailing help@vestednetworks.com.