Creating a Temp Forward/Holiday Message: Difference between revisions
(Created page with "= Creating a Temp Forward/Holiday Message = If your business has to suddenly be closed due to unforeseen circumstances, you need to be able to let your customers know what is going on. In this article, you will learn step by step how to put up a message for your customers when they call in. === Login to https://nova.vestednetworks.com === === First thing we need to do is create a time frame for when we want our message to play. Click on the Time Frame tab up at the to...") |
No edit summary |
||
| (6 intermediate revisions by the same user not shown) | |||
| Line 1: | Line 1: | ||
This page is part of the [[NOVA Manager Portal]] section. | |||
= Creating a Temp Forward/Holiday Message = | = Creating a Temp Forward/Holiday Message = | ||
'''This guide will help you configure your phone system for:''' | |||
- Holiday Closures | |||
- Unexpected Office Closures | |||
- Custom Messages for Customers | |||
'''We’ll walk you through:''' | |||
- Verifying your Routing User | |||
- Updating an Existing Holiday Auto Attendant | |||
- Creating a New Holiday Auto Attendant | |||
= | = Verifying the Routing User = | ||
Login to https://nova.vestednetworks.com | |||
Before making any changes, it’s important to confirm that you’re editing the correct Routing User. This ensures updates are made to the right Time Frames and Auto Attendants—specifically for calls to your company’s main phone number. | |||
Steps: | |||
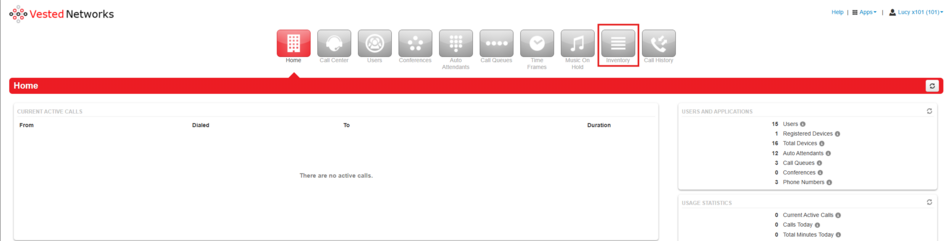
# Go to your Domain’s Inventory, click on the "'''Inventory'''" tab at the top of the screen.<blockquote>[[File:TFAA.0.1.png|frameless|951x951px]]</blockquote> | |||
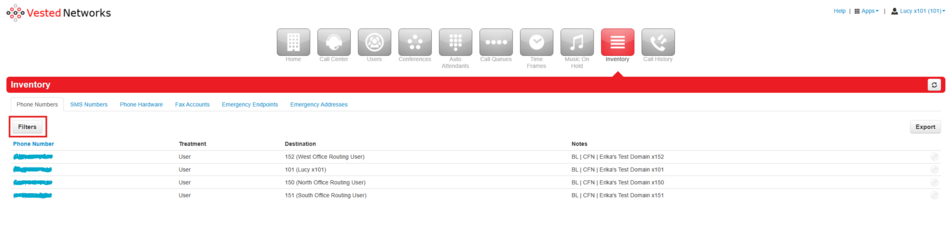
# Click the "'''Filter'''" button in the top-left corner. <blockquote>[[File:Tfaa.0.2.2.png|frameless|951x951px]]</blockquote> | |||
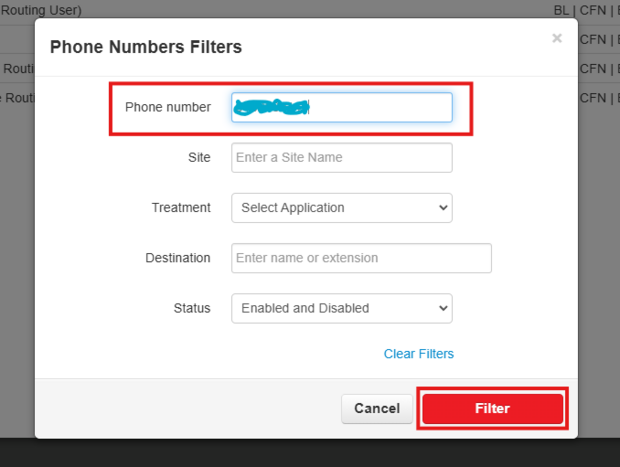
# Under Phone Numbers, enter your company's main number (the number your customer will be calling). Click the red "'''Filter'''" button.<blockquote>[[File:Tfaa.0.3.png|frameless|620x620px]]</blockquote> | |||
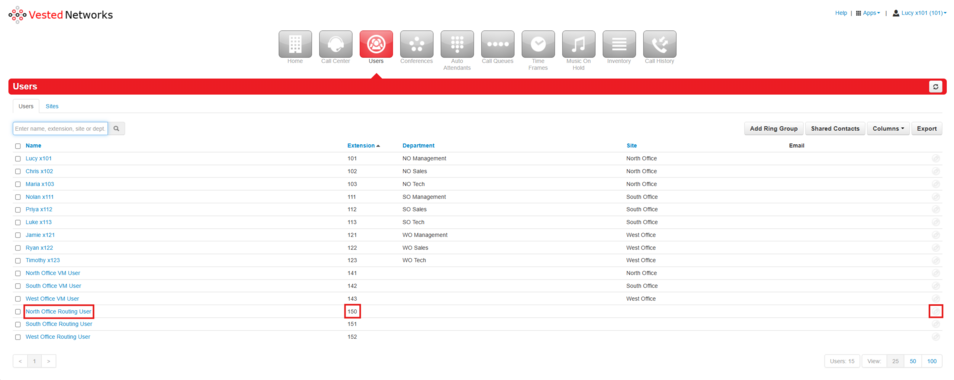
# Look under Destination - this is the '''Routing User''' that handles your main number. Take note of this user, you'll reference it when updating your '''Time Frame (TF)''' and '''Auto Attendants (AA)'''.<blockquote>[[File:Tfaa.0.4.png|frameless|978x978px]]</blockquote> | |||
== | = Updating an Existing Holiday Auto Attendant = | ||
If you already have a Holiday Time Frame and Auto Attendant set up, follow these steps to update them. If you're unsure how to check and see if you have a Holiday Time Frame or Auto Attendant, you can still look through these steps to see if you'll need to create or update one. | |||
=== | == Check for Existing Holiday Settings == | ||
# Click on the "'''Users'''" tab at the top of the screen.<blockquote>[[File:Tfaa.1.1.png|frameless|972x972px]]</blockquote> | |||
# Search for and click on your '''Routing User''' {For this example, I'll be using my North Office Routing User that has an extension of 150}<blockquote>[[File:Tfaa.1.2.png|frameless|954x954px]]</blockquote> | |||
# Open the '''Answering Rules''' tab.<blockquote>[[File:Tfaa.1.3.png|frameless|980x980px]]</blockquote> | |||
# Note the '''Holiday Time Frame''' and Holiday '''Auto Attendant''' assigned, these are the two things we'll be updating.<blockquote>[[File:Tfaa.1.4.png|frameless|991x991px]]</blockquote> | |||
== | == Update the Holiday Time Frame == | ||
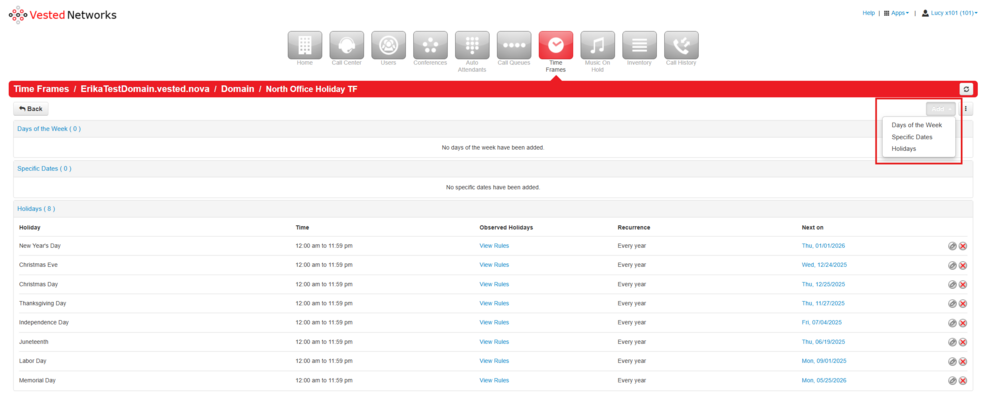
# Click on the "'''Time''' '''Frames'''" tab at the top of the screen.<blockquote>[[File:Tfaa.1.5.png|frameless|999x999px]]</blockquote> | |||
<blockquote>[[File: | # Click the blue “'''Domain'''” link to view all Time Frames.<blockquote>[[File:Tfaa.1.6.png|frameless|1000x1000px]]</blockquote> | ||
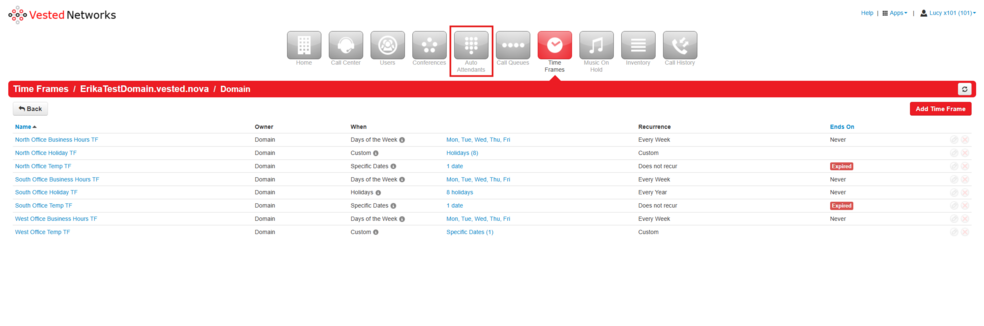
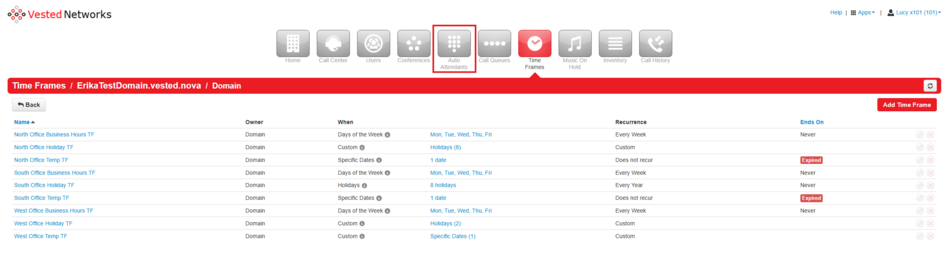
# Find your '''Holiday Time Frame''' and click to edit it {For this example, I'll be updating my North Office Holiday TF}<blockquote>[[File:Tfaa.1.7.png|frameless|1003x1003px]]</blockquote> | |||
# When editing your '''Holiday Time Frame''', follow the instructions below based on the Time Frame Type type that's been selected. There's Specific Dates, Holidays, or Custom time frames. | |||
## '''Specific Dates''' | |||
##* Click on each desired date. | |||
##* Click on the red plus sign to add them. | |||
##* Click on the red "Save" button to finalize.<blockquote>[[File:Tfaa.1.8.1.png|frameless|699x699px]]</blockquote> | |||
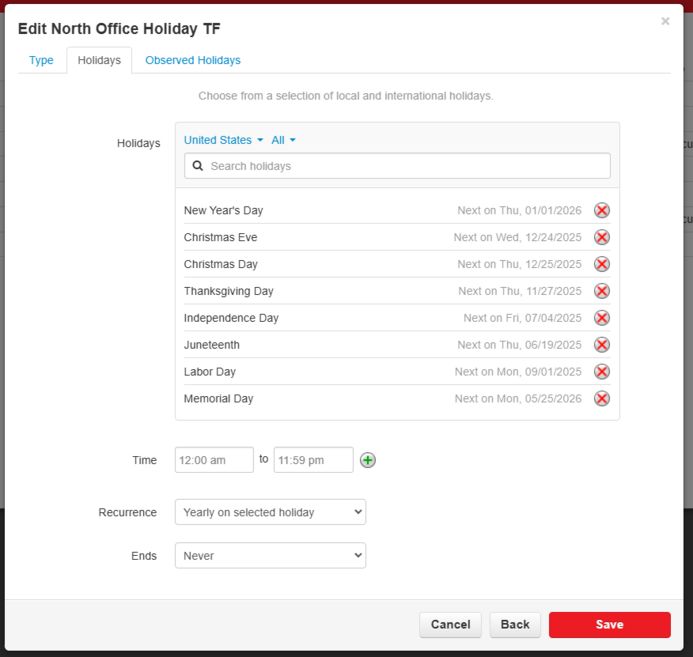
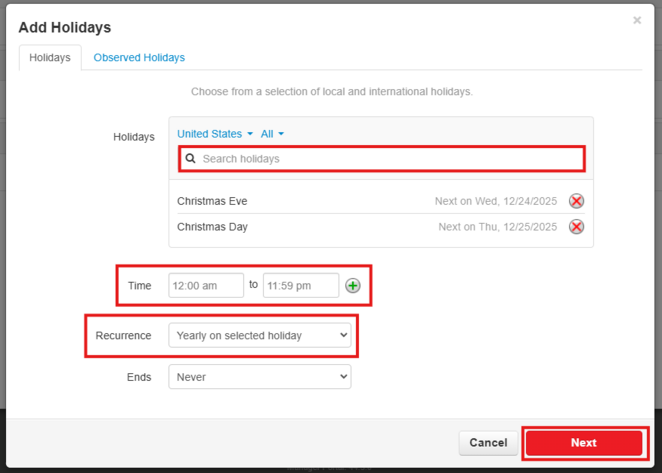
## '''Holidays''' | |||
##* Type in the name of the desired holiday. | |||
##* Set the Time of Day (typically left as 12:00 AM to 11:59 PM to play the message all day) | |||
##* Set Recurrence to “Yearly on selected holiday” so it repeats automatically each year. | |||
##* Click the red “'''Save'''” button.<blockquote>[[File:Tfaa.1.8.2.png|frameless|693x693px]]</blockquote> | |||
## '''Custom''' | |||
##* Depending on your needs, configure the Specific Dates or Holidays section using the steps above. Custom allows you to pick multiple Time Frame types.<blockquote>[[File:Tfaa.1.8.3.png|frameless|984x984px]]</blockquote> | |||
# Click the red “'''Save'''” button to save your changes. | |||
== | == Update the Holiday Auto Attendant == | ||
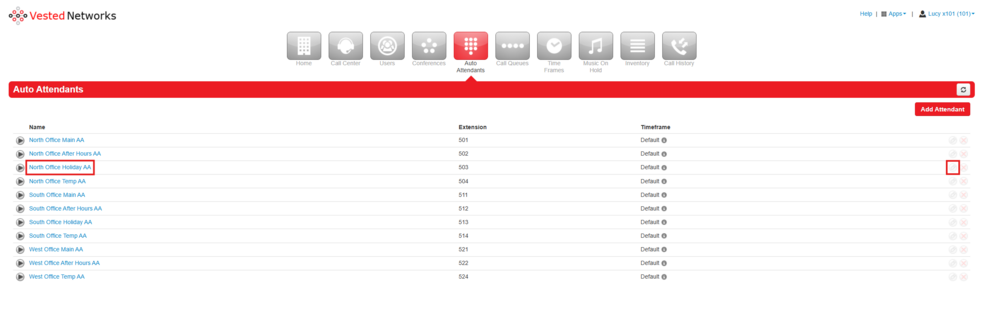
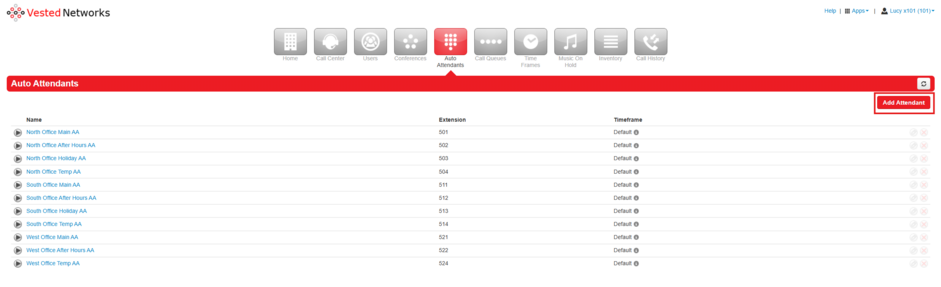
# Click on the "'''Auto''' '''Attendants'''" tab at the top of the screen.<blockquote>[[File:Tfaa.1.9.png|frameless|984x984px]]</blockquote> | |||
# Find and edit your '''Holiday Auto Attendant'''. {''For this example, I'll be clicking on my "North Office Holiday AA" Auto Attendant''}<blockquote>[[File:Tfaa.1.10.png|frameless|981x981px]]</blockquote> | |||
# To update the '''Holiday AA message''' as needed, click on the pencil icon. You can also Upload or Record your message if you don't want to use text-to-speech. Once you're done editing the message, click the red “'''Save'''” button. This is also where you can update your '''Dial Pad Menu''' if needed (To change where voicemails go for example).<blockquote>[[File:Tfaa.1.11.png|frameless|972x972px]]</blockquote> | |||
# Click “'''Save'''” at the bottom when done to save all changes to your '''Holiday Auto Attendant'''.<blockquote>[[File:Tfaa.1.12.png|frameless|968x968px]]</blockquote> | |||
== | == Prioritize the Holiday Rule == | ||
# Return to the "'''Users'''" tab.<blockquote>[[File:Tfaa.1.13.png|frameless|963x963px]]</blockquote> | |||
<blockquote>[[File: | # Select your '''Routing User'''.<blockquote>[[File:Tfaa.1.14.png|frameless|957x957px]]</blockquote> | ||
# Open the '''Answering Rules''' tab.<blockquote>[[File:Tfaa.1.15.png|frameless|952x952px]]</blockquote> | |||
# Drag the '''Holiday Time Frame''' rule to the top of the list so that it takes priority over the other rules (such as regular business hours and default). ⚠️ '''Do not move the “Default” rule!''' ⚠️<blockquote>[[File:Tfaa.1.16.png|frameless|958x958px]]</blockquote> | |||
# Click the red “'''Save'''” button and you're done!<blockquote>[[File:Tfaa.1.17.png|frameless|958x958px]]</blockquote> | |||
== | = Creating a New Holiday Auto Attendant = | ||
If you don’t already have a Holiday Time Frame or Auto Attendant, here’s how to create them. | |||
=== | == Check for Existing Holiday Settings == | ||
# Verify your '''Routing''' '''User''' in the '''Inventory'''.<blockquote>[[File:Tfaa.2.1.png|frameless|955x955px]]</blockquote> | |||
<blockquote>[[File: | # Click on the "'''Users'''" tab at the top of the screen.<blockquote>[[File:Tfaa.2.2.1.png|frameless|964x964px]]</blockquote> | ||
# Search for and click on your '''Routing''' '''User'''. {''For this example, I'll be using my West Office Routing User that has an extension of 152''}<blockquote>[[File:Tfaa.22.0.png|frameless|951x951px]]</blockquote> | |||
# Under the '''Answering''' '''Rules''' tab, check if a Holiday Time Frame and Holiday Auto Attendant exist. If not, continue with the steps below.<blockquote>[[File:Tfaa.22.1.png|frameless|954x954px]]</blockquote> | |||
== | == Create a Holiday Time Frame == | ||
# Click on the "'''Time''' '''Frames'''" tab at the top of the screen.<blockquote>[[File:Tfaa.3.1.png|frameless|954x954px]]</blockquote> | |||
# Click the blue “'''Domain'''” link.<blockquote>[[File:Tfaa.3.2.png|frameless|951x951px]]</blockquote> | |||
# Click the red “'''Add Time Frame'''” button.<blockquote>[[File:Tfaa.3.4.png|frameless|939x939px]]</blockquote> | |||
# When creating a Holiday Time Frame, fill out the following fields: | |||
## '''Name''' | |||
##* Enter a name using a clear naming scheme. It's best to name it <u>''[Routing User] Holiday TF''</u> so you can easily identify which '''Routing''' '''User''' the '''Time''' '''Frame''' has been created for. | |||
## '''When''' | |||
##* Then you must select a Time Frame type, I prefer custom, which allows me to set both Holiday sand Specific Dates as needed. | |||
##* Then click the red “'''Save'''” button.<blockquote>[[File:Tfaa.3.5.png|frameless|782x782px]]</blockquote> | |||
# Now that you have the Time Frame created, you'll add in your desired dates.<blockquote>[[File:Tfaa.3.6.png|frameless|984x984px]]</blockquote> | |||
# I'm going to select “Holidays” and search for my desired Holidays | |||
#* '''Holidays''' | |||
#** Type in and select desired Holidays. | |||
#* '''Time''' | |||
#** Set your to and from time (I prefer selecting 12:00 am to 11:59 pm so that the message plays for the entire day, however, if you'd like this to just play during your business hours, you'd specify that here, example: 8:00 am to 5:00 pm) | |||
#* '''Recurrence''' | |||
#** Select Yearly on selected holiday to have this automatically take effect every year. Then, click on the red “Next” button. <blockquote>[[File:Tfaa.3.7.png|frameless|662x662px]]</blockquote> | |||
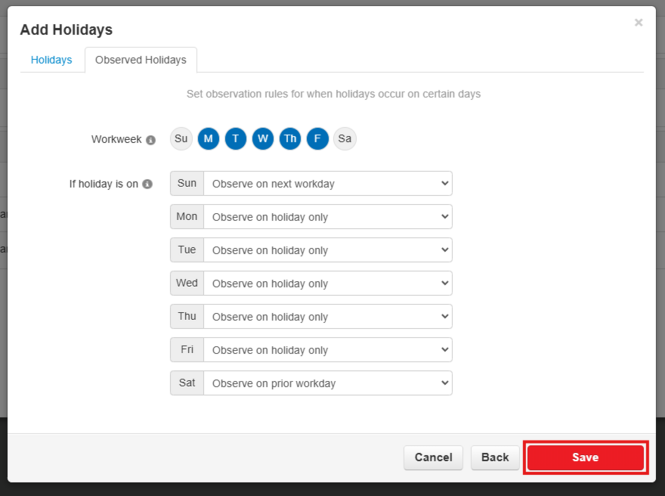
# Then click the red "'''Save'''" button. <blockquote>[[File:Tfaa.3.8.png|frameless|665x665px]]</blockquote> | |||
# Now that we have our dates added, we can go create our Auto Attendant. | |||
== | == Create a Holiday Auto Attendant == | ||
# Click on the "'''Auto''' '''Attendants'''" tab at the top of the screen.<blockquote>[[File:Tfaa.2.2.1.png|frameless|948x948px]]</blockquote> | |||
# Click the red “'''Add''' '''Attendant'''” button.<blockquote>[[File:Tfaa.3.10.png|frameless|941x941px]]</blockquote> | |||
# Fill out the Add an Auto Attendant fields | |||
#* '''Name''' | |||
#** Use the same naming scheme as previously discussed. | |||
#* '''Extension''' | |||
#** ⚠️ ALWAYS use a new, unused extension, if it says '''Warning''' next to the number, you must select a different one. It'll say '''New''' if done correctly. ⚠️ | |||
#* '''Time Frame''' | |||
#** ⚠️ ALWAYS set this to Default, do not apply any other time frames to your auto attendants ⚠️ | |||
#** Then click on the red "Add" button.<blockquote>[[File:Tfaa.2.2.2.png|frameless|679x679px]]</blockquote> | |||
# Edit the new '''Auto''' '''Attendant''', click on the pencil Icon or click on the field that says Click to add a new menu prompt <blockquote>[[File:Tfaa.3.12.png|frameless|975x975px]]</blockquote> | |||
# Fill out all parameters under Manage Audio | |||
#* '''New Greeting''' | |||
#** Select your greeting type (Text-to-Speech, Upload, or Record) For this example, I'll just be using Text-to-Speech. It may be easier to type your message in Notepad then copy and paste it into the message field. Then select the Voice you prefer, and click the red “'''Save'''” button. | |||
#* '''Message''' | |||
#** Enter in your desired message. | |||
#* '''Voice''' | |||
#** Select your desired text-to-speech voice. Then click on the red "'''Save'''" button.<blockquote>[[File:Tfaa.3.13.png|frameless|685x685px]]</blockquote> | |||
# Set Dial Pad Menu Options. | |||
## Select your Options number (the number the caller will press on their numpad) For example, to set up a Voicemail option, you'll select the number you want your callers to press {''For this example, Option 1''} | |||
## Select your application (this dictates what will happen when the number is pressed) <blockquote>[[File:Tfaa.4.1.png|frameless|698x698px]]</blockquote>3. Set required parameters (specify what the application does) {''In this example, I'm going to type out my West Office VM User''}<blockquote>[[File:Tfaa.3.15.png|frameless|713x713px]]</blockquote> | |||
# Click the red "'''Save'''" button. | |||
=== | == Assign new Holiday Rules to the Routing User == | ||
<blockquote>[[File: | |||
# Return to the "'''Users'''" tab<blockquote>[[File:Tfaa.3.16.webp|frameless|974x974px]]</blockquote> | |||
# Select your '''Routing User'''.<blockquote>[[File:Tfaa.3.17.webp|frameless|970x970px]]</blockquote> | |||
# Open the '''Answering''' '''Rules''' tab.<blockquote>[[File:Tfaa.3.19.webp|frameless|980x980px]]</blockquote> | |||
# Click on the red "'''Add''' '''Rule'''" button. | |||
#* Time Frame a. Select the Holiday Time Frame you created | |||
#* Call Forwarding a. Enable Call Forwarding --> Always, and set it to the Holiday Auto Attendant you created. | |||
#* Click the red "'''Save'''" button.<blockquote>[[File:Tfaa.3.20.png|frameless|628x628px]]</blockquote> | |||
== Prioritize the Holiday Rule == | |||
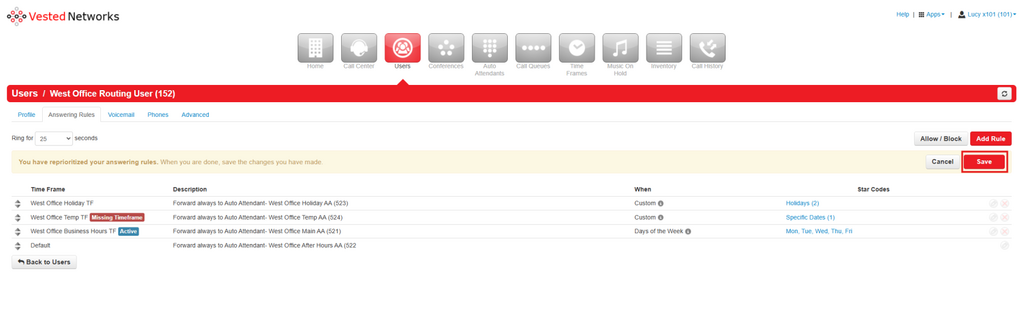
# In the '''Answering''' '''Rules''' tab, drag the Holiday Time Frame rule to the top of the list so that it takes priority over the other rules (such as regular business hours and default). ⚠️ Do not move the “Default” rule! ⚠️<blockquote>[[File:Tfaa.3.23.webp|frameless|1042x1042px]]</blockquote> | |||
# Click the red “'''Save'''” button. You're done!<blockquote>[[File:Tfaa.3.24.webp|frameless|1022x1022px]]</blockquote> | |||
If you have any questions about this process, or if you need assistance, please reach out to our Support Team by dialing HELP(4357) on your desk phone, calling (972) 924-6488, or submitting a ticket. | If you have any questions about this process, or if you need assistance, please reach out to our Support Team by dialing HELP(4357) on your desk phone, calling (972) 924-6488, or submitting a ticket. | ||
Latest revision as of 08:59, 17 June 2025
This page is part of the NOVA Manager Portal section.
Creating a Temp Forward/Holiday Message
This guide will help you configure your phone system for:
- Holiday Closures
- Unexpected Office Closures
- Custom Messages for Customers
We’ll walk you through:
- Verifying your Routing User
- Updating an Existing Holiday Auto Attendant
- Creating a New Holiday Auto Attendant
Verifying the Routing User
Login to https://nova.vestednetworks.com
Before making any changes, it’s important to confirm that you’re editing the correct Routing User. This ensures updates are made to the right Time Frames and Auto Attendants—specifically for calls to your company’s main phone number.
Steps:
- Go to your Domain’s Inventory, click on the "Inventory" tab at the top of the screen.
- Click the "Filter" button in the top-left corner.
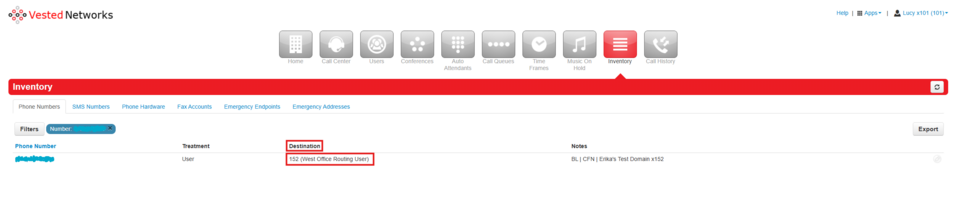
- Under Phone Numbers, enter your company's main number (the number your customer will be calling). Click the red "Filter" button.
- Look under Destination - this is the Routing User that handles your main number. Take note of this user, you'll reference it when updating your Time Frame (TF) and Auto Attendants (AA).


Updating an Existing Holiday Auto Attendant
If you already have a Holiday Time Frame and Auto Attendant set up, follow these steps to update them. If you're unsure how to check and see if you have a Holiday Time Frame or Auto Attendant, you can still look through these steps to see if you'll need to create or update one.
Check for Existing Holiday Settings
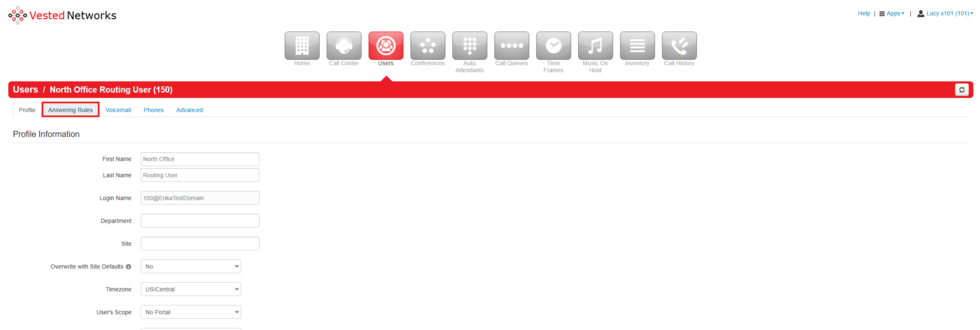
- Click on the "Users" tab at the top of the screen.

- Search for and click on your Routing User {For this example, I'll be using my North Office Routing User that has an extension of 150}
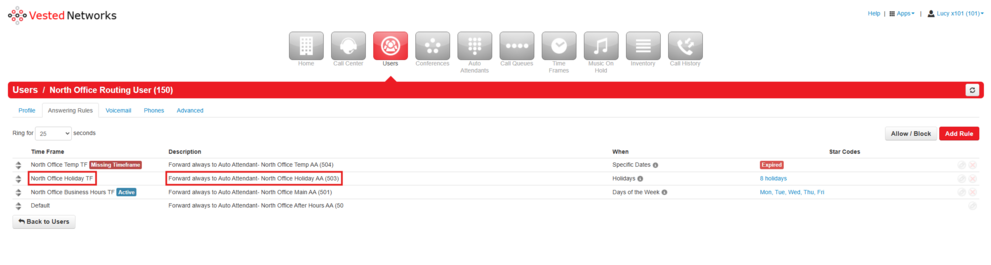
- Open the Answering Rules tab.
- Note the Holiday Time Frame and Holiday Auto Attendant assigned, these are the two things we'll be updating.


Update the Holiday Time Frame
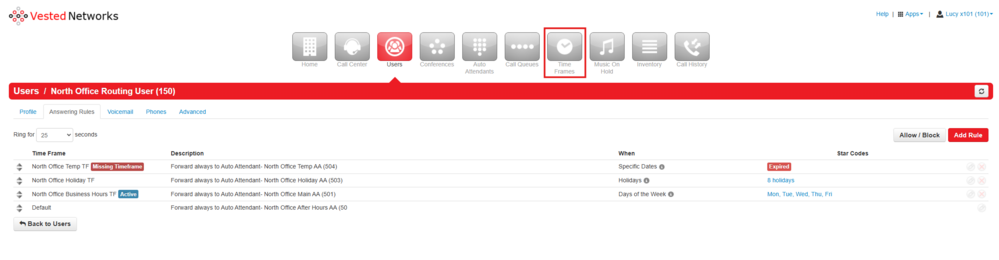
- Click on the "Time Frames" tab at the top of the screen.
- Click the blue “Domain” link to view all Time Frames.

- Find your Holiday Time Frame and click to edit it {For this example, I'll be updating my North Office Holiday TF}

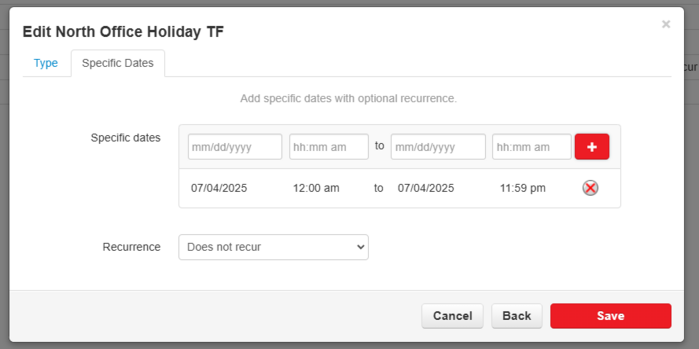
- When editing your Holiday Time Frame, follow the instructions below based on the Time Frame Type type that's been selected. There's Specific Dates, Holidays, or Custom time frames.
- Specific Dates
- Click on each desired date.
- Click on the red plus sign to add them.
- Click on the red "Save" button to finalize.
- Holidays
- Type in the name of the desired holiday.
- Set the Time of Day (typically left as 12:00 AM to 11:59 PM to play the message all day)
- Set Recurrence to “Yearly on selected holiday” so it repeats automatically each year.
- Click the red “Save” button.
- Custom
- Depending on your needs, configure the Specific Dates or Holidays section using the steps above. Custom allows you to pick multiple Time Frame types.
- Depending on your needs, configure the Specific Dates or Holidays section using the steps above. Custom allows you to pick multiple Time Frame types.
- Specific Dates
- Click the red “Save” button to save your changes.


Update the Holiday Auto Attendant
- Click on the "Auto Attendants" tab at the top of the screen.
- Find and edit your Holiday Auto Attendant. {For this example, I'll be clicking on my "North Office Holiday AA" Auto Attendant}
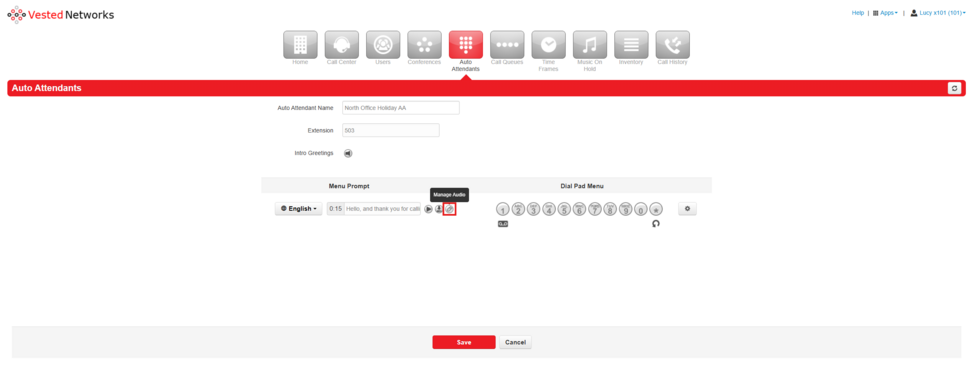
- To update the Holiday AA message as needed, click on the pencil icon. You can also Upload or Record your message if you don't want to use text-to-speech. Once you're done editing the message, click the red “Save” button. This is also where you can update your Dial Pad Menu if needed (To change where voicemails go for example).
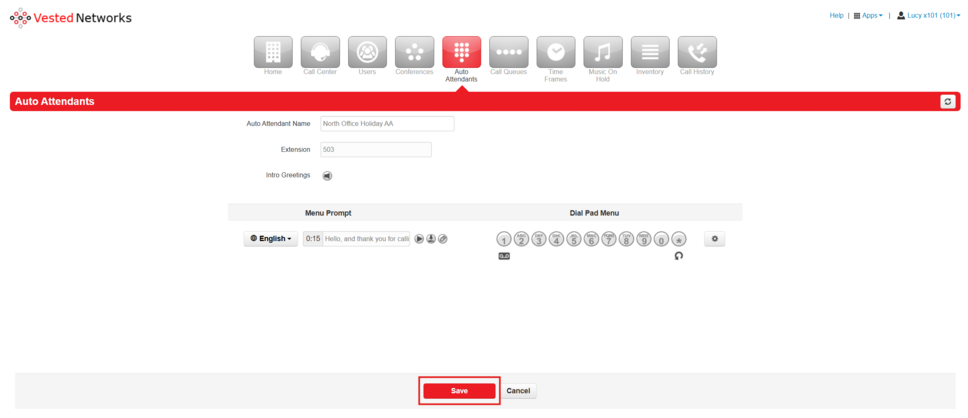
- Click “Save” at the bottom when done to save all changes to your Holiday Auto Attendant.


Prioritize the Holiday Rule
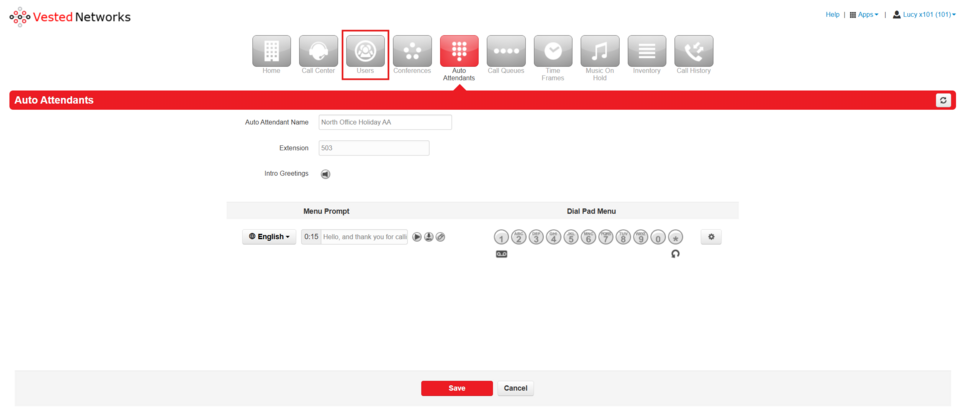
- Return to the "Users" tab.
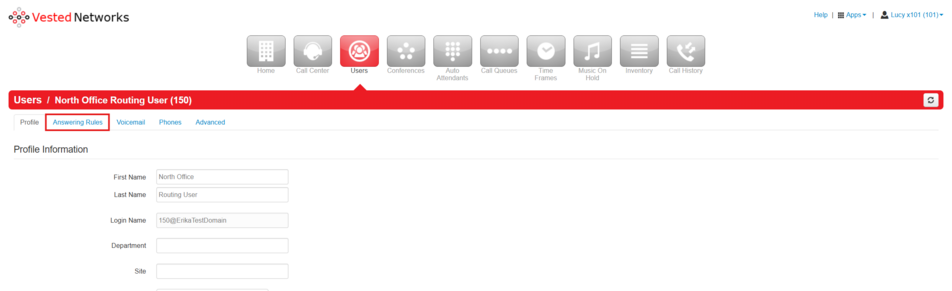
- Select your Routing User.

- Open the Answering Rules tab.
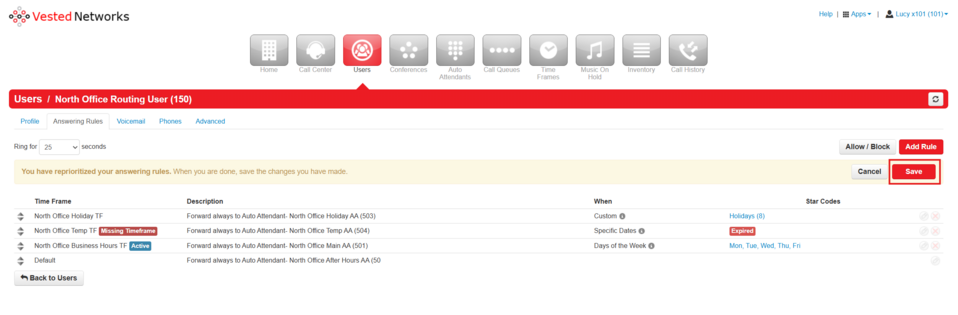
- Drag the Holiday Time Frame rule to the top of the list so that it takes priority over the other rules (such as regular business hours and default). ⚠️ Do not move the “Default” rule! ⚠️

- Click the red “Save” button and you're done!


Creating a New Holiday Auto Attendant
If you don’t already have a Holiday Time Frame or Auto Attendant, here’s how to create them.
Check for Existing Holiday Settings
- Verify your Routing User in the Inventory.
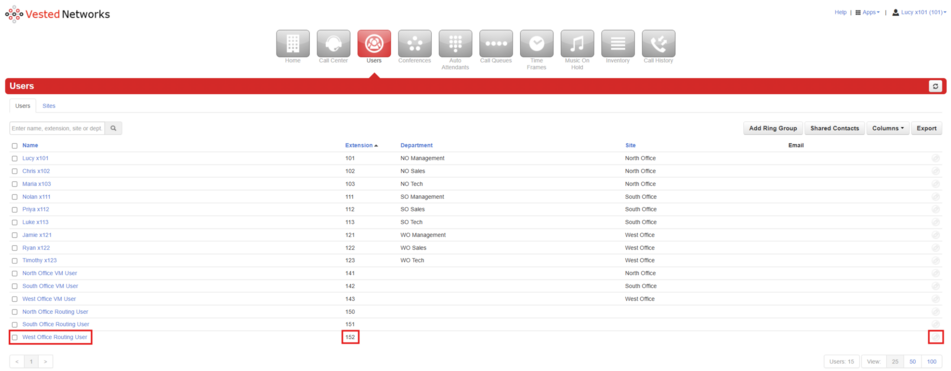
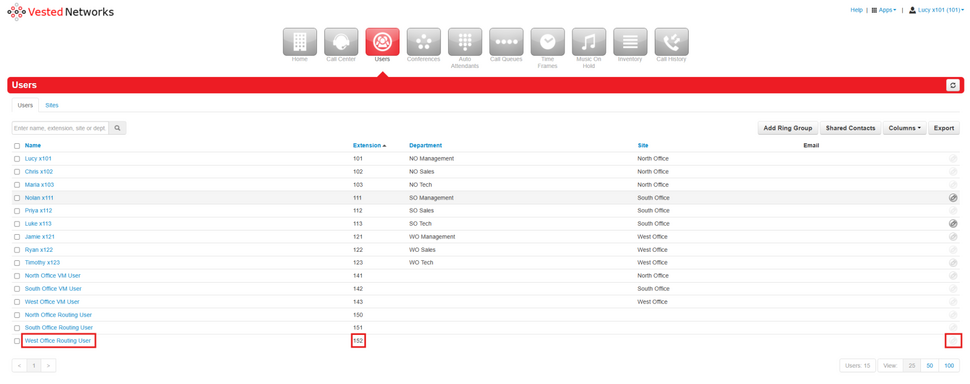
- Click on the "Users" tab at the top of the screen.

- Search for and click on your Routing User. {For this example, I'll be using my West Office Routing User that has an extension of 152}
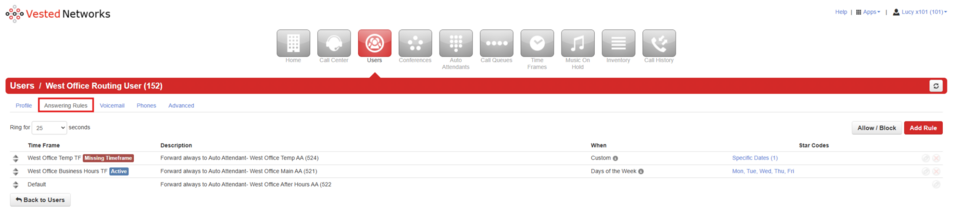
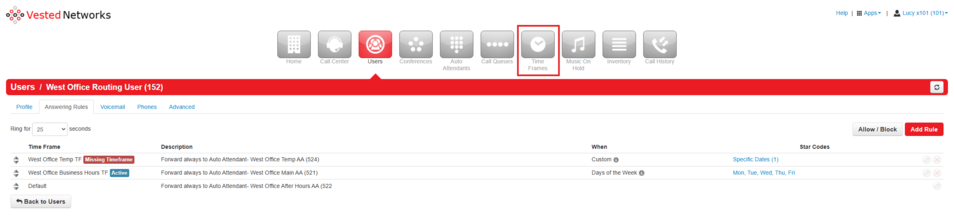
- Under the Answering Rules tab, check if a Holiday Time Frame and Holiday Auto Attendant exist. If not, continue with the steps below.


Create a Holiday Time Frame
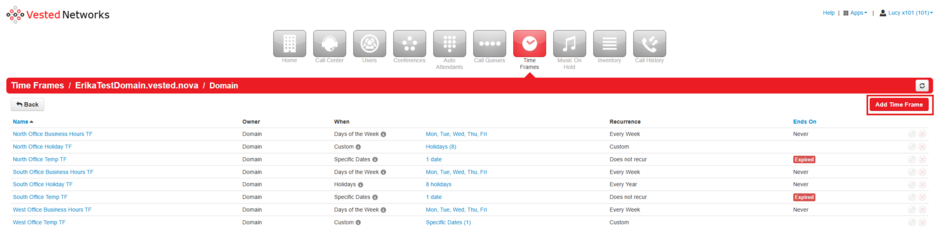
- Click on the "Time Frames" tab at the top of the screen.
- Click the blue “Domain” link.

- Click the red “Add Time Frame” button.
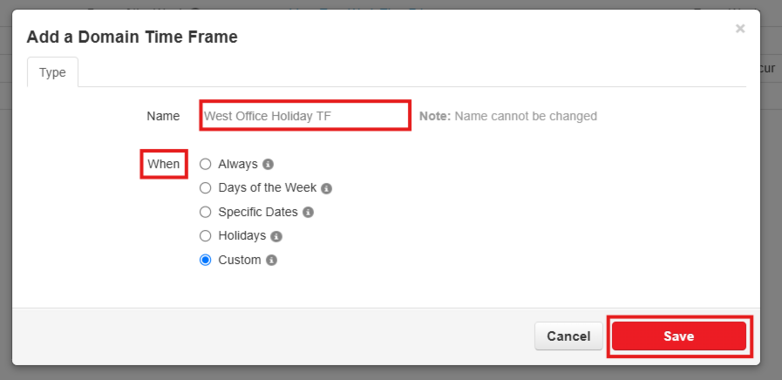
- When creating a Holiday Time Frame, fill out the following fields:
- Name
- Enter a name using a clear naming scheme. It's best to name it [Routing User] Holiday TF so you can easily identify which Routing User the Time Frame has been created for.
- When
- Then you must select a Time Frame type, I prefer custom, which allows me to set both Holiday sand Specific Dates as needed.
- Then click the red “Save” button.
- Name
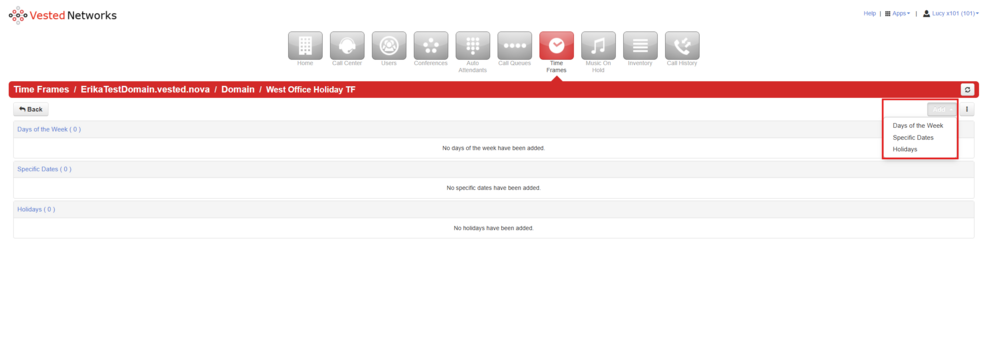
- Now that you have the Time Frame created, you'll add in your desired dates.
- I'm going to select “Holidays” and search for my desired Holidays
- Holidays
- Type in and select desired Holidays.
- Time
- Set your to and from time (I prefer selecting 12:00 am to 11:59 pm so that the message plays for the entire day, however, if you'd like this to just play during your business hours, you'd specify that here, example: 8:00 am to 5:00 pm)
- Recurrence
- Select Yearly on selected holiday to have this automatically take effect every year. Then, click on the red “Next” button.
- Select Yearly on selected holiday to have this automatically take effect every year. Then, click on the red “Next” button.
- Holidays
- Then click the red "Save" button.
- Now that we have our dates added, we can go create our Auto Attendant.


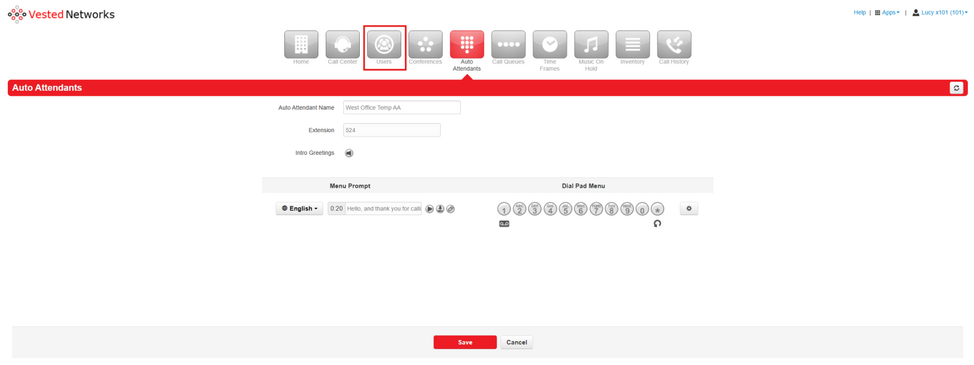
Create a Holiday Auto Attendant
- Click on the "Auto Attendants" tab at the top of the screen.
- Click the red “Add Attendant” button.
- Fill out the Add an Auto Attendant fields
- Name
- Use the same naming scheme as previously discussed.
- Extension
- ⚠️ ALWAYS use a new, unused extension, if it says Warning next to the number, you must select a different one. It'll say New if done correctly. ⚠️
- Time Frame
- ⚠️ ALWAYS set this to Default, do not apply any other time frames to your auto attendants ⚠️
- Then click on the red "Add" button.

- Name
- Edit the new Auto Attendant, click on the pencil Icon or click on the field that says Click to add a new menu prompt
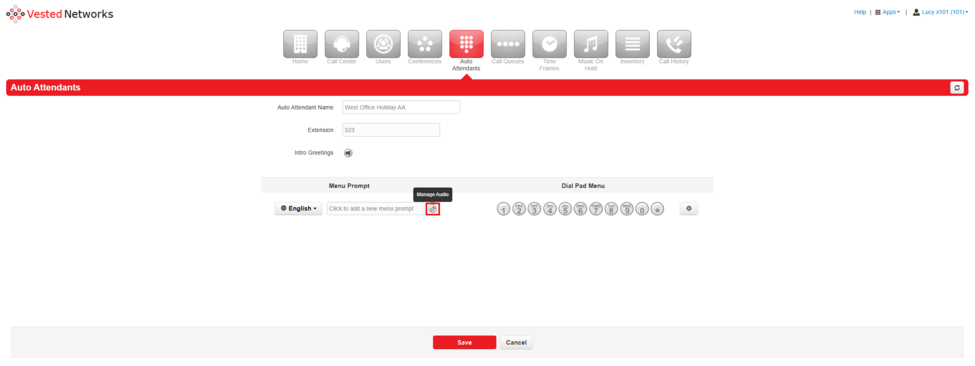
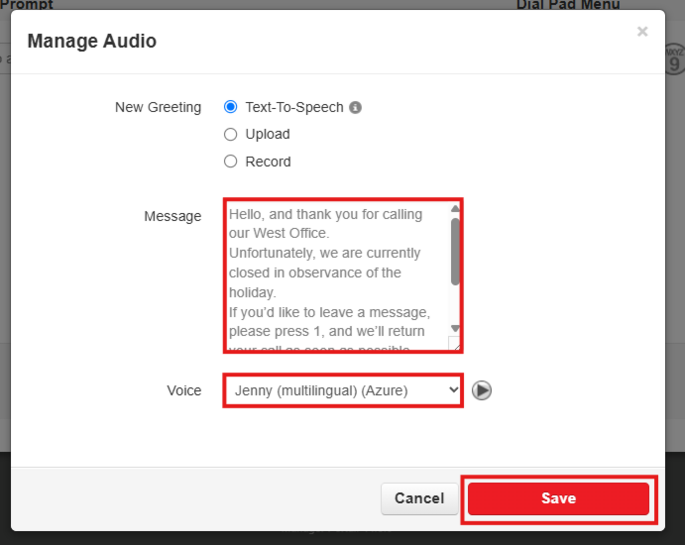
- Fill out all parameters under Manage Audio
- New Greeting
- Select your greeting type (Text-to-Speech, Upload, or Record) For this example, I'll just be using Text-to-Speech. It may be easier to type your message in Notepad then copy and paste it into the message field. Then select the Voice you prefer, and click the red “Save” button.
- Message
- Enter in your desired message.
- Voice
- Select your desired text-to-speech voice. Then click on the red "Save" button.
- Select your desired text-to-speech voice. Then click on the red "Save" button.
- New Greeting
- Set Dial Pad Menu Options.
- Select your Options number (the number the caller will press on their numpad) For example, to set up a Voicemail option, you'll select the number you want your callers to press {For this example, Option 1}
- Select your application (this dictates what will happen when the number is pressed)
3. Set required parameters (specify what the application does) {In this example, I'm going to type out my West Office VM User}
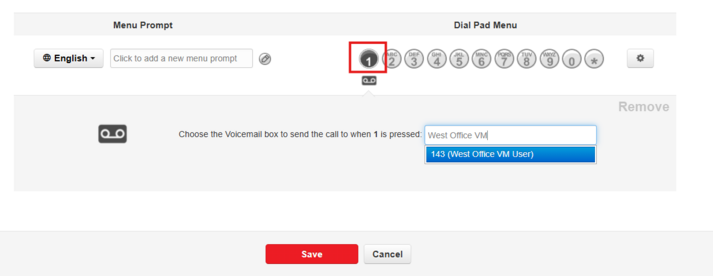
- Click the red "Save" button.


Assign new Holiday Rules to the Routing User
- Return to the "Users" tab
- Select your Routing User.
- Open the Answering Rules tab.
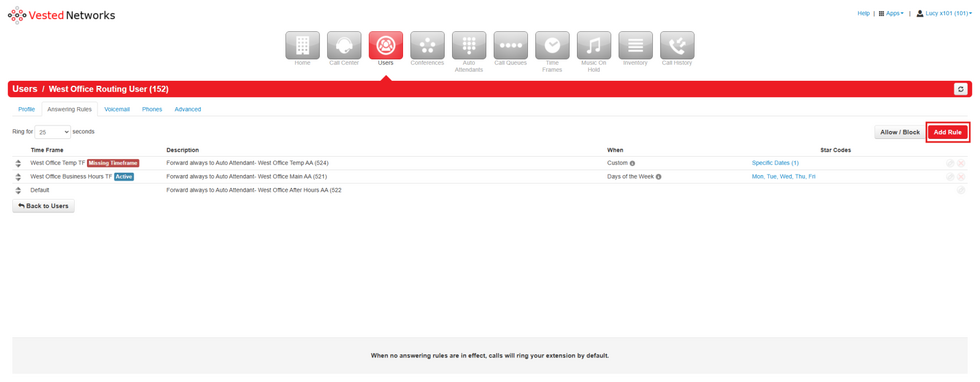
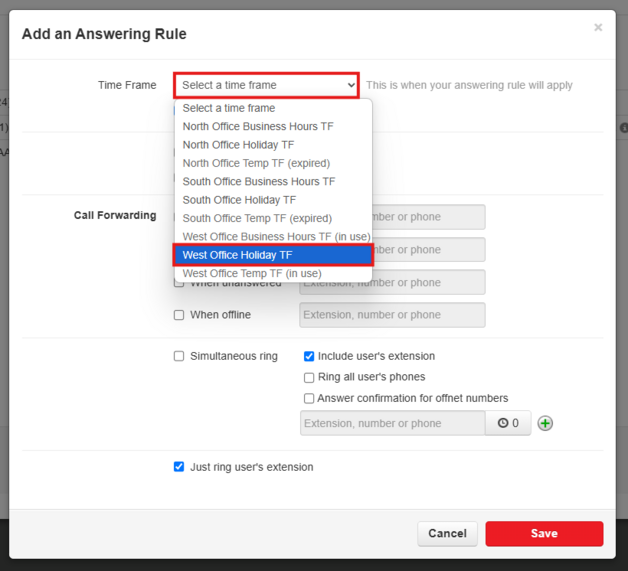
- Click on the red "Add Rule" button.
- Time Frame a. Select the Holiday Time Frame you created
- Call Forwarding a. Enable Call Forwarding --> Always, and set it to the Holiday Auto Attendant you created.
- Click the red "Save" button.


Prioritize the Holiday Rule
- In the Answering Rules tab, drag the Holiday Time Frame rule to the top of the list so that it takes priority over the other rules (such as regular business hours and default). ⚠️ Do not move the “Default” rule! ⚠️
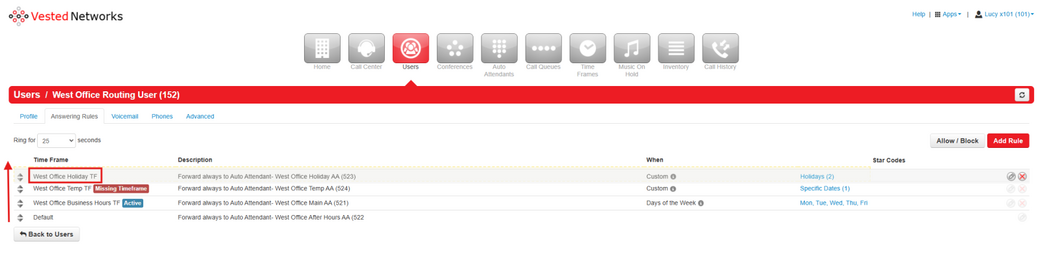
- Click the red “Save” button. You're done!


If you have any questions about this process, or if you need assistance, please reach out to our Support Team by dialing HELP(4357) on your desk phone, calling (972) 924-6488, or submitting a ticket.