Creating a Temp Forward/Holiday Message
This page is part of the NOVA Manager Portal section.
Creating a Temp Forward/Holiday Message
If your business has to suddenly be closed due to unforeseen circumstances, you need to be able to let your customers know what is going on. In this article, you will learn step by step how to put up a message for your customers when they call in.
Time Frames
Login to https://nova.vestednetworks.com
First thing we need to do is create a time frame for when we want our message to play. Click on the Time Frame tab up at the top. Then click on Add Time Frame in the top right.

Add Time Frame
Now that we have a new time frame, it is time to set it up.
We need to give the timeframe a name and select the specific time and date we want using the calendar and sliders. You can also add multiple time frames using the green +. Once you are happy with your time frame, click save.
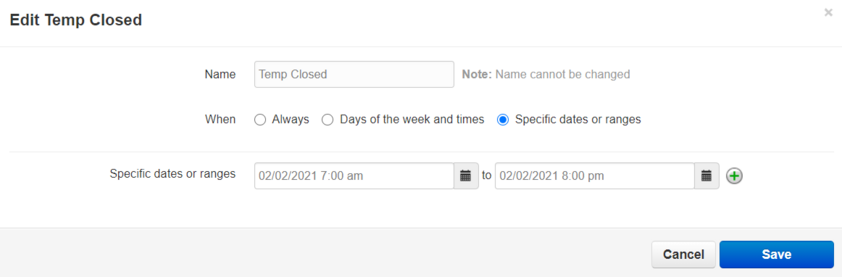
Click Save

Auto Attendants
Auto Attendants play messages and direct traffic. If you want to play an after-hours greeting and take a message, this is how you would do it.
Now that we have a timeframe we need to create the auto attendant so that a message will play.
- Click on the Auto Attendants tab, then click on Add Auto Attendant

- Name the Auto Attendant whatever will make it easier to manage for you
- Make sure you create a UNIQUE extension number for the Auto Attendant. If you do NOT see the NEW next to It, then make it a different extension number
- ALWAYS set the time frame to be default (all the time). We will set the time frame for when we want the message to play later

Manage Audio
Once the Auto Attendant is created, we need to create the message we would like to play. Click on where it says, “Click to add new Menu prompt”.

Text To Speech
This is exactly like it sounds, it is a text to speech software we have integrated with our portal. There are about 15 unique voices to choose from
Upload
This option allows you to browse the files on your PC and choose an MP3 file to upload should you already have the message pre-recorded
Record
This option allows the system to call your extension or cellphone number to record a new message
- For this example, we will be using the Record Option.


Example
- Notice I entered the cellphone number of 4694694469, I could have simply entered my extension number there, and it would work the same way
- Click Call and once the call is answered, follow the prompts to complete the recording.
- After you complete the call, click the DONE button in the portal, and you will see your message automatically uploaded
- Now you can play the message, download the message, or edit the message
- If you gave the caller options in the menu prompt, then we need to make sure we create them in our auto attendant (Ex. Press 1 to leave a message, press 2 for our on-call tech)
- In this example, I am going to create an option 1 to go to voicemail. Simply click on number 1, click on voicemail, then enter the extension you want the caller to leave voicemails at
- Now I am going to set option 2 to route to my on-call technician. Click on the number 2, then External number, then type in the cellphone number you want the option to route to
- You can also set the auto attendant to go to an option automatically if no key is pressed, or if the wrong key is pressed. For example, I could tell the caller in my menu message “to leave a voicemail, press 1 or remain on the line.” To do this, click on the gear Icon on the right side of the dial pad, then choose your desired locations
- Once you are done, click Done


Apply Message
Almost done.. all that is left to do now is apply the message to our routing.
Inventory Tab
Verify the numbers and destinations
Click on the inventory tab to find out where your main number is being routed (more than likely it will be routed to user 150)
Users
Back over to the users tab to find your AA.
Find the user your number is pointed at (in this case 150), click on the user

Answering Rules

Add Rule
We are now going to add a rule during our time frame to go to our Auto Attendant

Select your time frame from the drop down.
Select the Call Forwarding Always option
Enter your auto attendant extension or name into the text box and choose the Auto Attendant- option, not the User or the VM!
Once done, click Save

Rule Priority
Answering rules are prioritized from top to bottom, so after the rule is added, click on the arrows on the left-hand side and drag your answering rule to the top
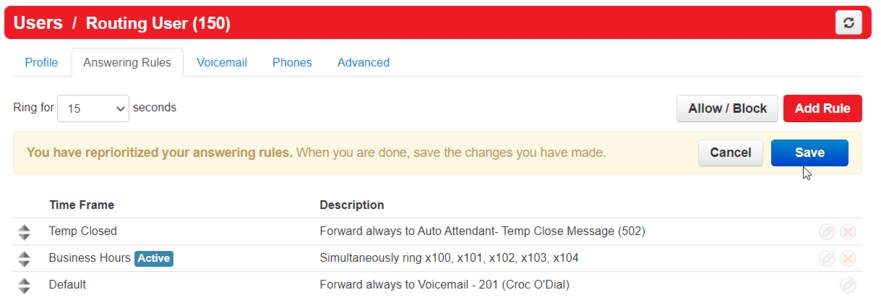
Click Save to make your answering rule a priority.
Once you are done, if you time frame is active it will show the blue active badge

If you have any questions about this process, or if you need assistance, please reach out to our Support Team by dialing HELP(4357) on your desk phone, calling (972) 924-6488, or submitting a ticket.