|
|
| (5 intermediate revisions by the same user not shown) |
| Line 1: |
Line 1: |
| This page is part of the [[NOVA Manager Portal]] section. | | This page is part of the [[NOVA Manager Portal]] section. |
|
| |
|
| This guide will walk you through all of the features offered in an Auto Attendant, and how to set them up! | | '''You will need to contact Vested Networks help desk to enable third party recording for your domain.''' |
| | An authorized decision maker will need to contact Vested Networks help desk or submit a ticket to enable remote storage for your domain. |
| | You will need to provide the IP/Hostname of the remote storage bucket so that we can ensure communication between our servers and your archive. |
| | |
| | '''Other important things to note:''' |
| | - Domain storage settings will attempt to remove remote files once they reach the limits set on your domain. Please confirm storage settings and configure a way to archive your calls remotely as necessary to avoid removal. |
| | - This feature is still under development and may not always function as intended. Please perform regular testing to confirm your call recordings are being stored correctly. |
| | - Only recordings made after enabling remote storage will be sent to your archive. Currently there is no way to push old recordings. (Currently in development) |
| | - If remote recording server is unreachable, a local copy of the recording will be available on the Vested Networks servers while waiting for your archive to become available again. |
| | - Our servers will attempt to upload call recordings to your remote archive within 15 minutes of a call being processed by our recording servers. |
|
| |
|
| = Portal = | | = Portal = |
| The first thing you need to do is log into the web portal at: https://nova.vestednetworks.com
| | Log into the web portal at: https://nova.vestednetworks.com |
| | |
| If you have never logged into the portal refer to the “First Time Logging into NOVA.” Once you are logged in click on the Auto Attendant icon at the top menu.<blockquote>[[File:Manager-Guide Auto-Attendant-Setup1.png|frameless|670x670px]]</blockquote>
| |
| | |
| === Add Auto Attendant ===
| |
| Click on Add Auto Attendant and the following will appear<blockquote>[[File:Manager-Guide Auto-Attendant-Setup2.png|frameless|602x602px]]</blockquote>
| |
| | |
| # Assign a name for the Auto Attendant, make it descriptive for what its purpose/function. For example: Business Hours AA, Holiday AA, Inclement Weather AA, Etc.
| |
| # Assign an extension starting with 500 and working up in increments of one. (500, 501, 502, etc.)
| |
| # Timeframe Select “Default (All The Time).” We use the default time frame as we can control its behavior in other ways.
| |
| # Click add and you can now start building your Auto Attendant.
| |
| | |
| === Building Steps ===
| |
| You should now be at this page<blockquote>[[File:Manager-Guide Auto-Attendant-Setup3.png|frameless|647x647px]]</blockquote>
| |
| | |
| === Greetings ===
| |
| The intro greeting allows you to place an “intro” that will play before the menu prompt greeting. You would use this in the following example, “Your call may be recorded for training purposes.” Etc. click on the speaker button and the following prompt appears.<blockquote>[[File:Manager-Guide Auto-Attendant-Setup4.png|frameless]]</blockquote>
| |
| | |
| ==== Add Greeting ====
| |
| | |
| Click on “Add Greeting.”<blockquote>[[File:Manager-Guide Auto-Attendant-Setup5.png|frameless|486x486px]]</blockquote>
| |
| | |
| ===== Greeting Types =====
| |
| There are three ways to add a greeting, Text-to-Speech, Upload or Record your greeting.
| |
| | |
| ====== Text-To-Speech ======
| |
| In Text-to-Speech you can type in your message and select a system voice to play your message.
| |
| | |
| ====== Message ======
| |
| Here is where you can type the message you want your text-To-Speech voice to attempt to say. Sometimes you may need
| |
| | |
| ====== Select Voice ======
| |
| | |
| After you select a voice click on the play button and you can hear what it would sound like.<blockquote>[[File:Manager-Guide Auto-Attendant-Setup6.png|frameless|310x310px]]</blockquote>
| |
| | |
| ====== Time Frame ======
| |
| | |
| | |
| Under Time Frame you can select when you want to run the intro.<blockquote>[[File:Manager-Guide Auto-Attendant-Setup7.png|frameless|317x317px]]</blockquote>Once you have completed all selections click on save to save the intro greeting. Then click on Done to close the Intro Greeting manager dialogue.
| |
| | |
| ===== Upload =====
| |
| <blockquote>[[File:Manager-Guide Auto-Attendant-Setup8.png|frameless|324x324px]]</blockquote>The next way to add a greeting is to upload a pre-recorded greeting. Give it a name, navigate to where the file is and click upload. Do not forget to click Save when you are finished.
| |
| | |
| ====== Time Frame ======
| |
| | |
| | |
| Just like in Text-to-Speech you can select when you want to run the intro.<blockquote>[[File:Manager-Guide Auto-Attendant-Setup7.png|frameless|317x317px]]</blockquote>
| |
| | |
| ===== Record =====
| |
| | |
| Lastly, To record a greeting, the system will call your extension or your cell phone.<blockquote>[[File:Manager-Guide Auto-Attendant-Setup9.png|frameless|383x383px]]</blockquote>
| |
| | |
| ====== Time Frame ======
| |
| | |
| | |
| Just like in Text-to-Speech, and upload, you can select when you want to run the intro.<blockquote>[[File:Manager-Guide Auto-Attendant-Setup7.png|frameless|317x317px]]</blockquote>Once you answer the call you will be given directions on what to do and record your message.
| |
| | |
| If you do not like your message, you will be given the option to re-record the message. Make sure you select the Time Frame and Save.
| |
| | |
| ===== Manage Audio =====
| |
| | |
| Next, we will record your directive Auto Attendant that will direct the customer to the correct extension or user. Click on the pencil under Menu Prompt.<blockquote>
| |
| [[File:Manager-Guide Auto-Attendant-Setup10.png|frameless|413x413px]]</blockquote>
| |
| Again, we can use the Text-To-Speech, Upload, or record a message. Please follow the directions above for the exact process. Once you are finished click on save and it will upload the file.
| |
| | |
| === Programming The Numbers ===
| |
| <blockquote>[[File:Manager-Guide Auto-Attendant-Setup11.png|frameless|626x626px]]</blockquote>
| |
| Next, we are going to program the numbers. Think of them like the speed dial numbers that you would program on you phone. Each number will give you various options on what or where you want to direct the customer as shown below.
| |
| | |
| In this tutorial we will cover over each of the functions but Demonstrate the most commonly used ones. [[:File:Manager-Guide Auto-Attendant-Setup9.png|Manager-Guide Auto-Attendant-Setup]]
| |
| | |
| ==== User ====
| |
| will direct the customer the extension of the user or department.
| |
| | |
| ==== Conference ====
| |
| will send the customer to a scheduled conference.
| |
| | |
| ==== Call Queue ====
| |
| if set up will send to a call queue for a department or division. Usually used for large volume of calls.
| |
|
| |
|
| ==== Directory ====
| |
| will send the customer to the Company Directory.
| |
|
| |
|
| ==== Voicemail ====
| | Once you are logged in click on the Call History icon from the top menu.<blockquote>[[File:Manager-Guide Call History 1.png|frameless|891x891px]]</blockquote> |
| Will sent the customer directly to Voicemail
| |
|
| |
|
| ==== Voicemail Management ==== | | === Recording Storage Settings === |
| this allows company employees to call in and check their voicemail.
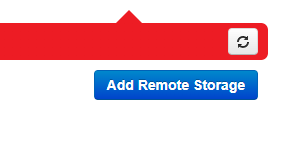
| | Click on Recording Storage Settings and the following will appear on the right hand side.<blockquote>[[File:Manager-Guide Third Party Storage 1.png|frameless]]</blockquote> |
|
| |
|
| ==== External Number ==== | | === Selecting a Provider === |
| Dial and external number like maintenance, etc.
| | You should now see the following page.<blockquote>[[File:Manager-Guide Third Party Storage 2.png|frameless|603x603px]]</blockquote> |
|
| |
|
| ==== Play Message ==== | | ==== Name ==== |
| can be used to give out your directions to the facility, hours of operation and/or fax number. Just about anything that is informational.
| | Give your remote storage a name. |
|
| |
|
| ==== Repeat Prompt ==== | | ==== Enable ==== |
| pressing this will allow the customer to repeat the greeting prompt again.
| | Turn your remote storage on or off. |
| | ==== Storage Type ==== |
|
| |
|
| ==== The Plus Sign ====
| | Select your AWS, Wasabi, or FTP type. These are the only supported methods at this time. |
| Adds an additional tier for more information and options. It looks the same and is assigned to a number. Think of an additional tier like when you hear "for more options press 7."
| |
|
| |
|
| === Example Scenario ===
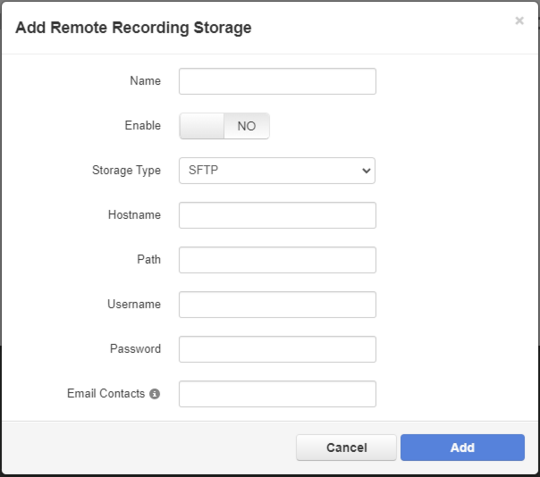
| | You will need to provide credentials and the storage locations for the method you choose.<blockquote>[[File:Manager-Guide Third Party Storage 3.png|frameless|540x540px]]</blockquote> |
| <blockquote>[[File:Manager-Guide AutoAttendantSetup12.png|frameless|861x861px]]</blockquote> | |
|
| |
|
| * Button 1 - Forwards call to a Specific user or queue. Example Usage: For emergency requests, please press one to be connected to on-call staff.
| | ===== Checking your work ===== |
| '''Note:''' The Caller ID Prefix is where you can add the department prefix or other flag, so you can mark what type of call is coming in.
| | After filling out the required fields in the modal, the '''Add''' button should be clickable. |
| * Button 2 - Allows caller to search the company directory. Example Usage: Please use your dial pad to type the first 3 characters of your party's last name.
| |
| * Button 3 - Send call directly to a voicemail. Example Usage: If you are calling after 5pm and need to leave a message please press three.
| |
| '''Note:''' Leaving “enable enhanced voicemail” checked will use the system prompt to leave a message rather than the user's voicemail greeting.
| |
| * Button 4 - Play a Greeting. Example Usage: To hear our new business hours, please press four.
| |
| * Button 9 - Pushes call to a sub-menu. Example Usage: For more options, please press nine.
| |
| * Button 0 - Repeat current prompt. Example Usage: To hear these options again, please press zero.
| |
|
| |
|
| === Additional Options ===
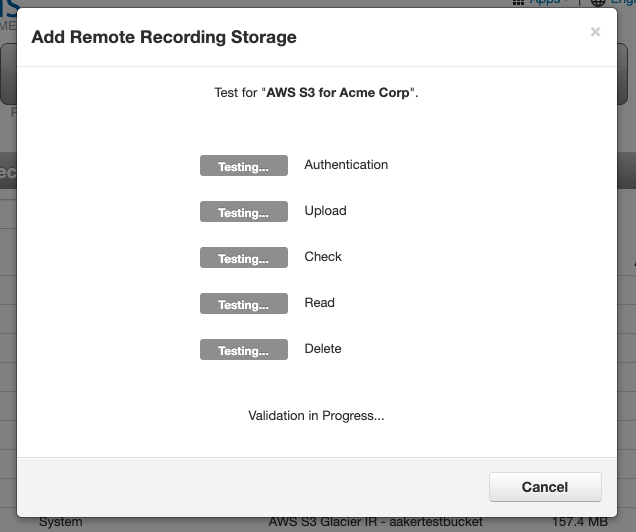
| | Now the system will audit the addition of this configuration. |
|
| |
|
| ==== Basic Options ====
| | Using the information provided, the Portal will work alongside the API to authenticate the remote side, upload a small .wav file, read it back, and then remove it to test all access requirements for this feature to perform correctly. |
| After you finish setting up how you want the Auto Attendant to act, click on the Gear to the far right and additional options will appear.<blockquote>[[File:Manager-Guide AutoAttendantSetup13.png|frameless|484x484px]]</blockquote>
| |
|
| |
|
| ===== Dial By Extension =====
| | This process should take between 2 and 15 seconds. <blockquote>[[File:Manager-Guide Third Party Storage 4.png|frameless|636x636px]]</blockquote> |
| If you do not want dial by extension remove the check mark.
| |
|
| |
|
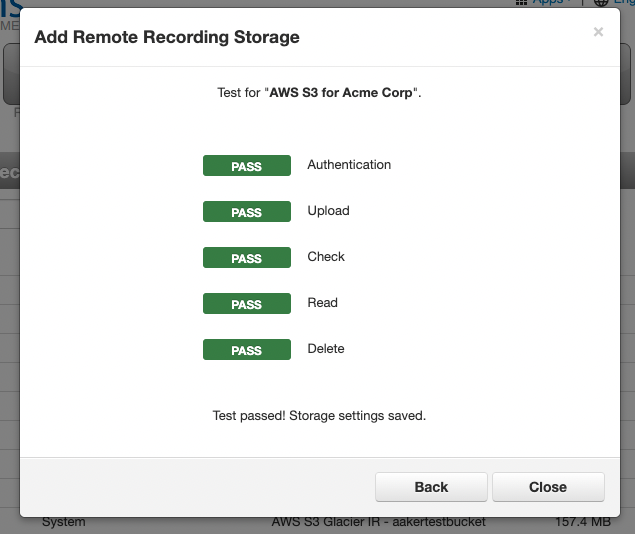
| ===== If no key or unknown key is pressed ===== | | ===== Success ===== |
| <blockquote>[[File:Manager-Guide AutoAttendantSetup14.png|frameless|334x334px]]</blockquote>Choose what happens when an invalid key is pressed. Usually you will repeat the greeting endlessly, hang up, or forward to a speed dial or call queue. | | If validation succeeds you will get something similar to this:<blockquote>[[File:Manager-Guide Third Party Storage 5.png|frameless|635x635px]]</blockquote> |
|
| |
|
| This drop down list will be determined by what speed dials you have configured. Each level will give you the same options.
| | ===== Failures ===== |
| | We will attempt a best effort case to make sure that our servers can communicate with your storage provider but cannot assist with authentication, remote storage settings, remote recovery, or other modifications to files that are not hosted on our servers. |
|
| |
|
| ===== Timeouts and Max Presses =====
| | If we have verified that our servers and your remote storage can communicate, you will need to contact your storage provider's support for further assistance. |
| The next three sliders give the ability to set the timeout options for each feature.<blockquote>[[File:Manager-Guide AutoAttendantSetup15.png|frameless|438x438px]]</blockquote>
| |
|
| |
|
| ==== Speech Keywords ====
| | Any additional troubleshooting of the remote storage settings is generally considered outside the scope of Vested Networks support. |
| Speech Keywords allows the customer to speak a word and the system auto dials, like “support” or "directory."<blockquote>[[File:Manager-Guide AutoAttendantSetup16.png|frameless|639x639px]]</blockquote>When you are finished click done then SAVE on the Auto Attendant creation page. If you don’t your changes or updates will not be saved.
| |
|
| |
|
| Once the Auto Attendant is configured and saved it can now be added to a main number directly or to a routing user.
| | If you have any questions about this process, or if you need other assistance, please reach out to our Support Team by dialing HELP(4357) on your desk phone, calling (972) 924-6488, or submitting a ticket to help@vestednetworks.com |
| If you have any questions about this process, or if you need assistance, please reach out to our Support Team by dialing HELP(4357) on your desk phone, calling (972) 924-6488, or submitting a ticket to help@vestednetworks.com | |
This page is part of the NOVA Manager Portal section.
You will need to contact Vested Networks help desk to enable third party recording for your domain.
    An authorized decision maker will need to contact Vested Networks help desk or submit a ticket to enable remote storage for your domain.
    You will need to provide the IP/Hostname of the remote storage bucket so that we can ensure communication between our servers and your archive.
Other important things to note:
    - Domain storage settings will attempt to remove remote files once they reach the limits set on your domain. Please confirm storage settings and configure a way to archive your calls remotely as necessary to avoid removal.
    - This feature is still under development and may not always function as intended. Please perform regular testing to confirm your call recordings are being stored correctly.
    - Only recordings made after enabling remote storage will be sent to your archive. Currently there is no way to push old recordings. (Currently in development)
    - If remote recording server is unreachable, a local copy of the recording will be available on the Vested Networks servers while waiting for your archive to become available again.
    - Our servers will attempt to upload call recordings to your remote archive within 15 minutes of a call being processed by our recording servers.
Portal
Log into the web portal at: https://nova.vestednetworks.com
Once you are logged in click on the Call History icon from the top menu.
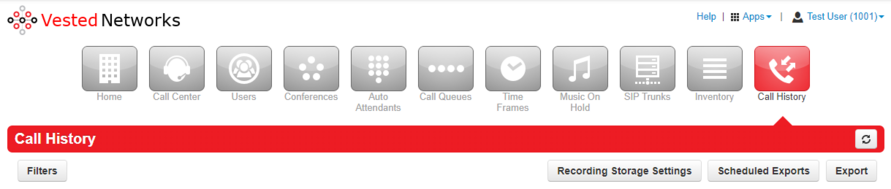
Recording Storage Settings
Click on Recording Storage Settings and the following will appear on the right hand side.
Selecting a Provider
You should now see the following page.
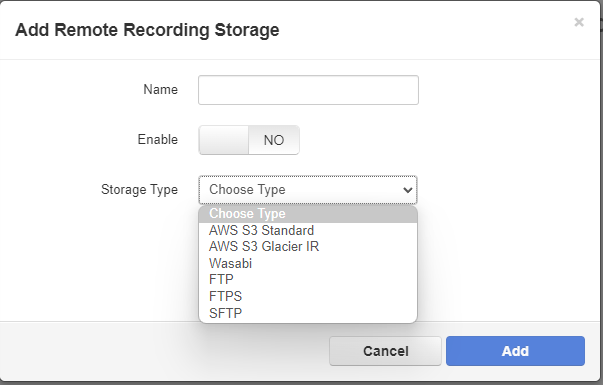
Name
Give your remote storage a name.
Enable
Turn your remote storage on or off.
Storage Type
Select your AWS, Wasabi, or FTP type. These are the only supported methods at this time.
You will need to provide credentials and the storage locations for the method you choose.
Checking your work
After filling out the required fields in the modal, the Add button should be clickable.
Now the system will audit the addition of this configuration.
Using the information provided, the Portal will work alongside the API to authenticate the remote side, upload a small .wav file, read it back, and then remove it to test all access requirements for this feature to perform correctly.
This process should take between 2 and 15 seconds.
Success
If validation succeeds you will get something similar to this:
Failures
We will attempt a best effort case to make sure that our servers can communicate with your storage provider but cannot assist with authentication, remote storage settings, remote recovery, or other modifications to files that are not hosted on our servers.
If we have verified that our servers and your remote storage can communicate, you will need to contact your storage provider's support for further assistance.
Any additional troubleshooting of the remote storage settings is generally considered outside the scope of Vested Networks support.
If you have any questions about this process, or if you need other assistance, please reach out to our Support Team by dialing HELP(4357) on your desk phone, calling (972) 924-6488, or submitting a ticket to help@vestednetworks.com


